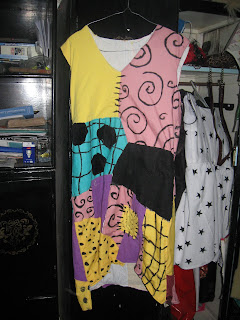
Notes on the last tutorial:
Instead of sewing the base dress together, I would recommend trying to sew the patches on to the dress pieces first, then sew the dress together. It was very difficult to pin down the pieces (I found that putting an A3 folder inside the dress helped to strech out the cloth, which made pinning easier).
Step 1:
Once everything is sewn down, sewing the dress up. If you are adding a zip now is the time to do it. My neckhole is actually large enough for me to get into the dress without a zip, so I didn't bother using one.
Step 2:
If you want to hem the dress, go ahad and hem it. To hem my dress, I turned the outer layer and the inner layer in towards each other. This sandwiches the raw edges between the fabric when it is sewn shut. For a more ragged edge you can sew a zip zap stitch along the hem.
Here's what it should look like.
Step 3:
Decorate. Add the stitches on the dress with paint or a permanent marker.
Step 4:
Time to make the sleeves. I used a sleeve pattern that I had in my collection of patterns, but if you want a very ragged finish, you can simply sew a strip of fabric around the arm hole. I wanted very ragged sleeves, so I only sewed a zig zag stitched on the part of the sleeve that would be sewn to the dress.
You should get something like this.
You can make the sleeves shorter or more ragged.
And you're done.
This is a really good project if you want to experiment with various techniques, such as applique, patchwork, dying (I dyed the yellow sleeve in turmeric), painting and printing. Just throw on some white tights, stripy socks and a yarn wig, and you're Sally.
Hope you enjoyed the tutorial.


No comments:
Post a Comment