Sunday, January 2, 2022

Black and White Stripes: Part 2

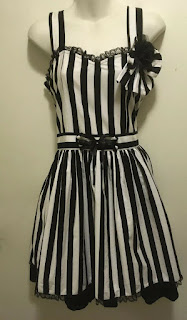
 I made a few alterations to my striped dress. I added an extra panel to the back bodice, and added shirring. This shirring is quite basic: I didn't want to use elastic thread or make casings, so I just stretched out elastic and sewed it on with a zigzag stitch. It's not as neat as the other methods, but when the elastic wears out, it will be much easier to replace. I had to adjust the skirt and remove some of the gathers in order for the skirt and back panel to be the same size.

There's also lace sewn to the neckline and the black ruffles.

I added a belt. This is made from scrap material. The front is interfaced, and the back is just a single layer of fabric with hemmed edges. There's a little bit of black lace in there too. It ties at the back.


Made a little bow to go with my dress. I used scraps and some interfacing. There's a safety pin sewn on to the back.


Saturday, January 1, 2022

Black and white stripes: Part 1

 My last sewing project of 2021 was something I wanted to make for a while: a black and white striped dress. My hair is currently bright green, so the chance to look like Beetlejuice was to good to miss. Of course, I decided to sew it in less than 24 hours, hours before the small celebration we held. 
My inspiration is the BtSSB's Kuranosuke Stripe JSK. I saw this dress years ago on F Yeah Lolita's blog, and had always liked it (this original post about the dress is here http://www.fyeahlolita.com/2010/12/btssbs-kuranosuke-stripe-jsk.html ). The actual JSK is out of my budget, and I don't really wear lolita fashion in any case, but I liked the basic idea.

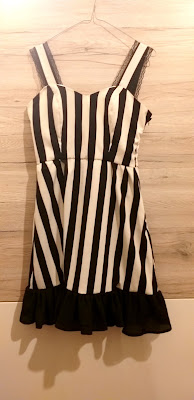
I bought these two dresses on facebook marketplace to use to sew this dress. As I had limited time, I simplified the design somewhat. The striped dress forms the main part of the dress.
I used this black dress too. I removed the bottom ruffle to use on the striped dress. What remained makes a nice blouse. 

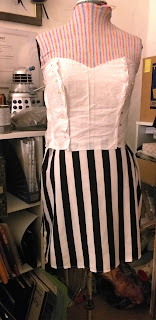
I used a Burdastyle bodice pattern. I need to resize this pattern because it was very tight. I cut the lining from white cotton. After taking the striped dress to pieces, I had to take some time to place the pattern pieces to make sure that the stripes would line up properly when I sewed it. It was worth taking this extra time on this part of the project, because I really like how to stripes on the bodice look. 


I cut the ruffle from the black dress, then cut it until it was the right width and length. I had to measure multiple times to make sure that theskirt would not be too long, as I wanted it to be just above the knee. I gathered the black fabric into a ruffle, then pinned it to the dress. It was tricky to pin the ruffle on, but once it was n place I sewed it on with a straight stitch. 

I made a lining layer for the skirt from some white acetate. It's not the prettiest but since it's hidden under the skirt, I don't mind too much. I match up the stripes on the front of the skirt and bodice, then gathered the rest of the skirt to fit the bodice. I also added an invisible zip to the side seam. 
I made the straps from leftover striped material, and lining them with black cotton. Rather than top-stitching the black lace on, I sewed it between the striped material and the lining. 

I handsewed the bodice lining closed at the waist and along the zip, and the dress was done. 

The dress looks lovely. It will need altering, because the bodice is really tight. The plan is to add a panel of shirring to the back. I'm also thinking of adding the black bustled panel to the skirt. The skirt isn't full enough to be proper lolita, but it would be nice to add a little more volume. 


Thursday, August 19, 2021

Princess Mononoke: San progress


I've finally had time to work on a costume. Last time I worked on this costume was either 2016 or 2017! I had only finished the dress, apron, some of the jewellery, and the mask/ears.

The mask is based on a tutorial by chezlin on youtube https://www.youtube.com/watch?v=AUF7gCnH4OI&ab_channel=chezlin I highly recommend her videos. She gives very clear instructions, and most of the materials she uses are easy to find.

The weapons are also based on Chezlin's tutorials 
https://www.youtube.com/watch?v=uy24upuW0Hw&ab_channel=chezlin
I used bamboo, card, and red cord. I did paper-mache the blades to add strength. The cord was shiny, so I weathered it with acrylic paint.


The faux fur for the cloak is from Mohair Bear https://www.mohairbearmakingsupplies.co.uk/fabric-room/faux-fur-fabrics/long-pile-faux-fur-fabrics 
If I were to buy the fur now, I would have chosen fur with variegated colour rather than plain white. Even animals with solid coloured coats have colour variety in their fur, and some different coloured hairs would have looked more natural than the plain white fur. 
The cloak is held on with the necklace. There are hidden buttons sewn on the cloak, and the necklace attached to those.
I hemmed the cloak by hand because I didn't like the look of the raw edges. 

The ears are made of thick card. The idea was to make them lightweight: cardboard might have been a better choice, but this card is probably more durable. Originally I just sewed the ears on to the fur hood, but they were much too floppy.
To fix the floppy ears, I cut a rectangular piece of EVA foam and glued it to the inside on the hood, then sewed the ears through the foam and fake fur. The base of the ears pushes against the foam, stopping them from flopping around. The foam also helps the mask to stay on, though I am thinking of adding a strap for extra security. 

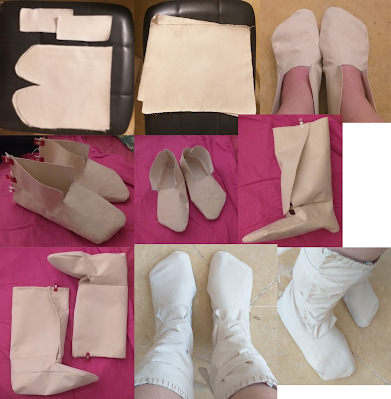
In my first San costume I wore uggs, but I decided to try making my own boots. This is the same faux suede material that I used for the apron. I used two tutorials for guidance:
https://www.tapatalk.com/groups/paleoplanet69529/moccasins-101-how-to-make-one-piece-moccasins-t14813.html 
http://kalizk-kreations.blogspot.com.mt/2016/10/building-sanboots
The faux suede is backed with interfacing to add some structure. I am thinking of sewing a thicker material to the soles. The original plan was to glue foam to the sole, but that would make it a bit difficult to put these boots on. 

Constellation Dress: Photos

Photos by Med Photography https://www.facebook.com/med.photography96 
Dress based on the art of Alexandra Dvornikova https://allyouneediswall.tumblr.com/

We went to a local forest (forest might be an overstatement, it's tiny) in January. My hair was already pink so I didn't bother with a wig. I'm wearing my Sansa cloak over the dress. 


Tuesday, March 30, 2021

New 52 Harley Quinn

It seems that I also forgot to upload the process of making New 52 Harley Quinn. 
I think that I made this in 2016 and wore it to Mondocon 2016.   
This project was partly an effort to use up extra fabric that I made. I used a sparkly red material that I used for Gazelle's costume, and a black vinyl. 
I used a Burdastyle bustier and hot-pants pattern to make this costume. 
The applique was a little tricky, and this vinyl is a bit annoying to sew: especially when top-stitching. I bought a teflon foot but unfortunatley it isn't compatible with my machine. I get around this by laying tissue paper over the shiny vinyl while I sew.
The bustier looks good, and I like the clean lines, but if I ever remade it, it would be longer. I don't think the cropped appearance suits me.
This is what the finished costume looks like. I don't have any nice photo unfortunately. I wore a labcoat over this because it was a chilly day. I also wore my Suicide Squad wig. 


Quick and Easy Harley Quinn Costume

I was looking through my old harley Quinn costumes:


 And i realised that I forgot to write about this one


I put this costume together very quickly for Halloween, even though we couldn't go out to celebrate. I even dyed my hair for fun (the vet on shift was very nice and said she liked my hair). 
This costume is inspired by one of the character designs from Injustice.
I took the elements that I liked (belt, crop top, trousers) and based my costume on those. 

This is a simple costume. The only thing I needed was fabric paint (I used acrylic paint mixed with fabric medium). I had a white crop top, and drew on the design with pencil. I then used a small brush to paint in the design. It's better to go slowly, filling in the edges carefully. 

The trousers started like as a pair of red slacks. I pinned and sewed them to make the legs tighter. I also slathered them in paint. I painted on the diamond designs, and also added paint to the red leg for more texture. 

The trousers are very stiff as a result, but do have a nice texture. They also have pockets!

My flatmate's dog offered to be Bruce the Hyena <3

The rest of the costume is things that I already had, such as the boots, studded belt, and jewellery. 


I had already bleached and toned my hair, and it was easy to dye the ends. I diluted blue and pink dye with a lot of white conditioner, then applied to the ends of the ponytails.