

So I recently fell in love with Persona 4 (the anime; I sadly don't have time to play the game. This is the price of vet school). Chie and Kanji are probably my favourite characters. I decided that it would be fun to make Chie's costume. A lot of my costumes are quite elaborate, and I wanted a simple, comfy costume in my collection.
I also decided to try to use recycled materials where possible.
 To this end, I went to several thrift shops to look for ideal materials to make Chie's jacket. I settled on a men's sweater, and these two t-shirts. The sweater forms the base of the jacket, and the t-shirts are for trim and other little details.
I thought I'd share my process with you, so here we go!
The Jacket
 1) Planning: Before you pick up your scissors, study the objects you've bought, and see how you can piece them together to make your costume. I had a plan in mind before I bought my materials, but it's good to adjust your plan once you actually buy your materials. The sweater I bought had a v-neck, and was very loose, so I knew that I'd need to take it in and remove the v-neck. I also knew that I would need to remove the sleeves to add the stripes and change the cuffs.
 2) Deconstruction: Once you've had a good think and decided on your plan of action, you can start deconstructing your pieces as needed. I cut off the sleeves, and removed the cuffs. I put the sweater on a dress for (though if you have a friend to help you, you probably don't need a dress form), and took in the sweater, pinching and pinning the excess fabric. I measured and checked that my line was even, and I slowly cut away the extra material.
  3) I decided to use the extra material to make the collar. In hindsight, I should have waited until I had more extra material, because my collar was a little short.
i. Take you excess material (cut from the front of the sweater in my case) and lay it out
ii. Cut out strips of material. I made mine 2.5cm wide (+seam allowance).
iii. Sew them together. I used a sewing machine and used a small zigzag stitch. Sew lots of these pieces together: it's better to have too many and to cut the collar to size later.
iv. Once you've got a nice big piece, measure and cut another piece of material that is the same width and length as your sewn-together strip. I used the green t-shirt material: it will be hidden when the jacket is done so it doesn't matter too much.
v. Turn your tube of material right side out: you now have the basic collar done.
 4) Before I attached the collar, I decided to create the light green design on the front of the jacket. I used masking tape and chalk to map out the position of the patch. Once it looked right, I carefully peeled off the masking tape and stuck it to some paper to make a template. I added seam allowance and copied it on to my fabric. I also drew the template on to the jacket and cut out that material (leave seam allowances!). I used my overlock machine to sew on the light green fabric, but a sewing machine would work just as well.
5) The Collar: I pinned on the collar and sewed it on. You can use a zigzag stitch or an overlock for this part.
 6) Time for bias tape. To make this, I drew lines at 45 degree on the yellow t-shirt fabric. I cut long strips. Make them a little bit wide, just in case. Then I fold over the edges and ironed them over. Ta da, bias tape!
 7) Now let's sew on the bias tape. It will be used as trim for the front of the jacket and on the sleeves. Open up the bias tape, and face it right sides together with the jacket along the front edges. Pin it down and sew it on. Then I folded the bias tape over the edges, and hand stitched it down using a slip stitch. Sew up the sleeve and turn it right sides out. Once I was done, I ironed the edges to make it look crisp and neat.
  8) Sewing the bias tape on to the sleeves was a little more difficult. If I had to do this again, I would get hold of some hem tape or good fabric glue and stick the tape down first to stop it from sliding about. Firstly, I found the centre of the sleeves, and marked out where I wanted to put the yellow stripes, using chalk and a long rules. I then pinned the stripes in places and carefully sewed along the edges of each stripe. Once the stripes were sewn on, I sewed on the cuffs.
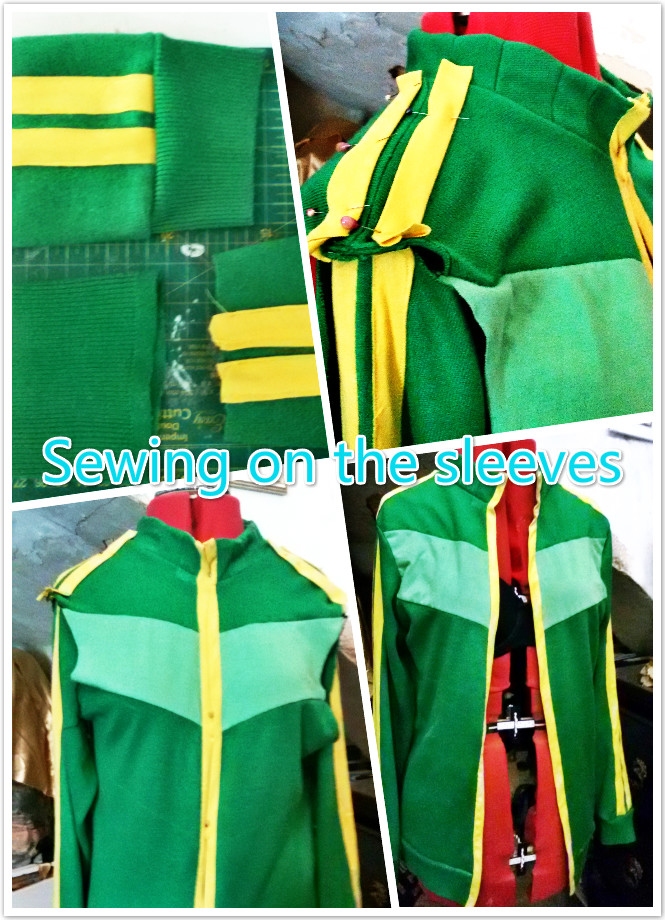 9) The stripes on Chie's jacket also extend to the shoulders. To help measure out their position, I pinned the sleeve to the arm-scye, then pinned the bias tape on to the shoulder. You can get an idea of how well the stripes match up by pinning the rest of the sleeves in place. Once you are happy with how it looks, you can pin on the sleeve properly and sew it on. The seams may be a bit bulky, so go slowly as you sew.
 10) The jacket is almost done. The only thing left is to add the zip. This took some time for me, as I had difficulty getting both sides to match perfectly. Take your time with this. Baste or pin the zip in place. Once everything looks good, carefully sew on the zip. I had to seam rip one section of the zip because the alignment was off. The zip was also a little too short, so I added a velcro closure to the collar.
Congrats, you've finished your jacket.

No comments:
Post a Comment