During the winter holidays, I wanted to redecorate my room. I'd done some work on it during the summer, but wasn't totally satisfied. it looked like this:
Not bad, but everything still looked very mismatched. I wanted a more "witchy" look to the room. It also had to be functional: I use my bedroom as an office and a craftroom too.
i tried to get everything secondhand. A lot of pieces were reused or repurposed. I avoided buying new things. The only big purchase was fabric for the curtains and duvet cover/pillowcases, and I still incorporated material that I already had.
The Table
This table started as a stained plain wood table. I wanted to freshen it up with paint and decoupage. I painted the table with black eggshell paint.
I bought some beautiful wrapping paper from Society6: the design is called Moonlight Garden, by Episodic drawing https://society6.com/product/moonlight-garden-olive-green_wrapping-paper?sku=s6-14289296p93a241v827
The wrapping paper isn't too thin, and is ideal for decoupage.
I stuck the wrapping paper to the top of the table, carefully smoothing it down. Once it was dry, I applied spray varnish. I am still considering painting on a varnish that will protect the paper more, or adding glass/plastic to cover the top.
The Mirror
We had this little mirror in the garage. It was originally a weird mushroom brown colour. After sanding down the original painted, I painted the mirror frame with gloss black paint. The mirror stand has a useful little shelf, which is great for storing cosmetics on my dressing table.
The Cupboard
The cupboard started out grey with black trim. As I wanted a witchy look for this room, I also used the Moonlight Garden wrapping paper to decorate the cupboard.
The doors of this cupboard are made from very old and dented wood. This meant a lot of sanding and filling in dents and cracks until the surface was somewhat smooth. I also removed the latch before continuing.
I carefully decoupaged the wrapping paper on to the door. I also cut the paper away from the hinges with a sharp scalpel. The whole thing is sealed with spray varnish. I'm also considering painting on varnish to properly protect the wrapping paper.
The Craft Desk
This started as a large laminate desk in an light orange-brown shade. I didn't think this colour went with the rest of my room at all, so I sanded it and painted it black. It's a bit difficult to paint laminated furniture, and the paint has chipped somewhat on some of the edges (I can't remember if I used primer, but I really should have!).
I wanted to decoupage the top with some black patterned wrapping paper. Unfortunatley the wrapping paper was thin and wrinkled badly once the varnish was applied.

I hid the mess under a piece of vinyl that is attached to the desk top with drawing pins. The vinyl is actually much more practical: the surface is slippery, so I can easily move the sewing machine around. It also breaks up the darkness of the cupboard and the rest of the desk.
The white shelves to the right of the desk aren't new, but I reorganised them a lot to make them neater. A lot of fabric is now stored in the cupboard instead of on the open shelves. Instead, I stored papers and sketchbooks on the shelves, and a few boxes of craft materials.
The Chair
I had a black chair with chipped paint and rust stains. I thought I'd have some fun decorating it with paints that I already have. I was inspired by Dre Ronayne, and decided to paint black and white stripes on the chair. The chair was already black, so I marked out stripes with masking tape and painted on the white stripes. While the paint was still tacky, I peeled off the tape. Once it was dry, I touched up the edges of the stripes to make them neater.
Curtains, Pillowcases, and Duvet Cover
The curtain I made previously were bright burgundy with gold stars. The material was very shiny. I didn't end up liking it, and decided new curtains were in order. I also wanted a matching duvet cover, and matching pillowcases.
I found this beautiful fabric at Ikea: it's called filodendron. I bought 6-7 metres but didn't have quite enough, so I used material that I already had for parts of this project.
The duvet cover has a panel of green velvet on the underside. It fastens with buttons.
The pillowcases are backed with silk that I bought from a charity shop. The silk was originally an acidic green colour, but I dyed them very dark green. These are simple slip-style pillowcases. I've heard that silk is very gentle on your skin and hair, so I thought that it made sense to use these pieces to make pillowcases.
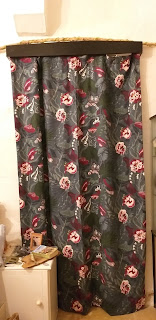
The curtains skim the floor, which helps to keep out drafts. They are lined with a really hideous green and yellow striped material: I made absolutely sure that this ugly material wouldn't peek out!
Display cabinet
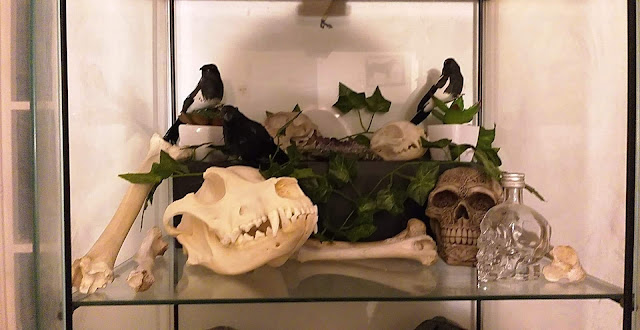
I have a collection of various interesting bits and bobs: bones, props I've made, pretty rocks etc. I wanted to display them properly and protect them from the dust. I was very lucky and found a display cabinet on Maltapark.
Then I spent some time arranging everything. I made some blocks from cardboard to create raised shelves for some of the items; without the higher shelf some objects en up hidden at the back of the cabinet.
Other bits and pieces
I found leaf wall stickers for sale on ebay. I underestimated their size, but then realised I could cover the bedside tables with them. I had bought an inexpensive pair of bedside tables. I didn't know how to decorate them at first, but the leaf stickers looked perfect. They fit the witchy theme without making the room too dark.
I found this little shelf in a charity shop, and painted it black. I also added screw hooks, a length of chain, and a wooden skewer to hang jewellery from. I'd like to add more decoration, as the black feels too plain. I tried adding some decoupage details but they are so dark that they blend in.
I added a lot of decorations to the room. I used old Pringles tubes to make pots for brushes and makeup; these were covered in wrapping paper (I can't find any photos unfortunately).
I also made a wooden sign for my door. I stole this idea from my younger brother. It's a copy of the sign on Bilbo's door in "Fellowship of the Ring". It's just a piece of paper glued to a small piece of wood, with a bit of acrylic paint for texture and detail.
The gold "paintings" are actually brass rubbings that my mum made in the 1970s. Originally the roll of paper was just lying around the house, but I thought these deserved to be framed.
I didn't include the other work desk in this blog because it isn't finished yet. I have made a sketch of some paint designs.
Hopefully I'll be able to make a second blog, or to update this blog.


No comments:
Post a Comment