Showing posts with label costumes. Show all posts

Friday, December 8, 2017

Costumes of 2017

Homura (Madoka: Rebeliion), San (Princess Mononoke); Punk! Usagi (Sailor Moon); Astrid (HTTYD 2); Alice (Alice: Madness Returns)
This was my initial costume list for 2017:
I only made one of these costumes: the Sailor Moon punk design. I started San, and have the materials for Alice and Astrid. Homura might not happen for a while.
So what DID I make or finish this year?

Punk! Usagi (Sailor Moon inspired)

A fun costume to wear, and it was easy to put together. I customised the t-shirt and waistcoat, and made a bat from foam (since airport security sadly confiscated the wooden bat)

Marceline the Vampire Queen (Adventure Time)

This turned out better than I had anticipated. We used HD powder to set the makeup but it didn't really work; next time I'll try talcum powder.

Chie Satonaka (Persona 4)

This costume was challenging because it had to make all the edges look so clean. The welt pockets were also difficult to make. I'm really pleased with the result. As a bonus, I made the jacket only from recycled materials.

Princess Serenity (Sailor Moon)
I made this costume a few years ago but only got the wig recently. I also swapped some of the trim. I might have to change more trim: the pearl leaf trim kept getting tangled in the wig.

Beatrice (Over the Garden Wall)
I really want to get a proper photoshoot with this costume. Hopefully I can persuade my boyfriend to be Wirt.

Velma (Scooby Doo) and Daria (Daria)

No photos yet, but these are ready. Some of the clothes were made or altered, but a few I owned or bought, such as socks and the orange jumper. 

Sansa Stark (Game of Thrones)

Probably the most detailed costume that I made this year. I'd never done such detailed embroidery before and I'm really pleased with the result. The base dress was easy, but details such as the collar were more difficult to construct. 

Skeleton/Ghost of Christmas Yet to Come (A Christmas Carol)
A simple costume I wore for the second day of Malta Comic Con 2017. I made the skeleton dress a few months before the con, and had made the cloak over the summer. 


Friday, March 10, 2017

Walkthrough: Punk! Usagi

The photos from February's shoot are in. Credit to Simon Spiteri Photography https://www.facebook.com/simspiphotography/ and Glen Taylor https://www.facebook.com/taylorsphotographymalta/ for their fantastic work. Check them out!

This costume is based on a drawing I did of Usagi from Sailor Moon, dressed in a punk style outfit. 

I don't think I sewed anything from scratch: everything was either taken from my wardrobe or modified.

The Denim Waistcoat


 Initially I bought a denim waistcoat and tried to bleach it. I failed spectacularly, because I could not get the colour to shift. I submerged it on bleach, I tried applying bleach directly, I put it in the washing machine with bleach, I even tried soaking it in salt water. Nothing. 
Instead, I bought a light blue denim jacket and cut off the sleeves. I designed the patch using watercolours and photoshop. I printed the final design on to t-shirt transfer paper, and transfered the design to a piece of fabric. I cut out the patch and stitiched it to the back of the waistcoat. For decoration I added metal studs, and my boyfriend let me use some of his badges and pins. I also made a pin from an old bottle cap

You can buy prints, t-shirts and more with this design on my Redbubble
https://www.redbubble.com/people/malteselizzie/works/24045245-in-the-name-of-the-moon-i-will-punish-you?asc=u&c=615024-sailor-moon  

The T-Shirt
Initially I had another t-shirt for this costume. I took a white t-shirt and dyed the top part red, and added eyelets and lacing to the sleeves. Unfortunately, the dye ran in the wash and turned the t-shirt orange. 
The shirt began as a plain white t-shirt. I drew the letters on with a permanent marker, tracing each letter carefully. A textile marker would be better, as permanent marker sometimes blurs in the wash. Instead of messing around with dye, I bought spray fabric paint. It has a liquid consistency, and behaves a bit like dye. It takes some practise to use, but I like the result. 

 The Bat
The bat is made from foam: the original wooden bat was unfortunately confiscated at the airport :( I cut up a camping mat and used a bamboo stick for the core of the bat. I painted it with acrylic paints, and wrapped the handle in duct tape. I also used a small piece of styrofoam to shape the end of the handle.
My cat would make a brilliant Luna, but I don't think he'd appreciate having to wake up for a photoshoot
The Wig and Accessories
The choker is a piece of ribbon, with a sequin cut into a moon shape. It closes with a snap. The shoes, gloves, earrings, tights, and shorts are all from my wardrobe.  The wig is from Coscraft: it's lovely, but as with all long wigs it tangles easily.


Monday, July 18, 2016

Suicide Squad: Harley Quinn: Shorts

These shorts - oh these shorts. I really recommend using stretchy sequin material, or buying two pairs of sequin shorts in red and blue, cutting them in half, and sewing them together. I used this material:
These are sequins sewn to a slightly stretchy mesh material. Since this is a bit see-through, it needed a backing fabric, and I used satin. So that meant a lot of messing around trying to create a good pattern. I used a combination of a Burdastyle shorts pattern, and another pattern made by copying an existing pair of shorts (made by covering shorts in masking tape to create a template)
This kind of sequin fabric is a bit annoying because it sheds sequins everywhere. There are still sequins in my bed and on the floor. You need to pick sequins out of the seam allowance so that the material can go through a sewing machine, though these sequins were so small that both my overlock machine and sewing machine could sew over them. Try to save any fallen sequins - you might need them.  
 The next step was to baste the sequin pieces to the satin pieces, then sew them into shorts. I also added bias tape to the leg hole so that the sequins wouldn't scratch me. Here's my cat, Pearl, helping me. I had to sew this by hand so that the stitches wouldn't be visible from the outside, and because I didn't want to try passing all the through the sewing machine.
So much work - and only one side is done!
 Hours later and the blue side is almost done
 And now sewn together
 I made my pattern too big by mistake, but this turned out to the advantageous, as it allowed me to add an elastic waistband, which was a lot less work than a zip. 


Sunday, June 19, 2016

Luna Lovegood and the End of Finals

Finals . . . are . .  . done! I've passed the first year of vet school. Only 4.5 years left (sob)

Actually found on the door of an exam room/office.
The moment I got my chemistry mark (last exam), I started work on some summer projects. I can't sew anything until I get home from Budapest, but i can start designing. 

One is a galaxy-print dress. I've been wanting to make one for a while. I want to make it from recycled materials, so I'm not sure if I  can achieve the full skirt, though the black underskirt will help with volume. 
 Another project is a Luna Lovegood inspired dress. I made Luna's Spectrespecs and thought I'd expand it into a simple costume (my university friends and I are planning a Harry Potter group for Halloween We've got a Ron, Hermione, Ginny, and Hagrid. There's some debate if I should be Malfoy or Luna though :P). 

SpectraSpecs Tutorial!

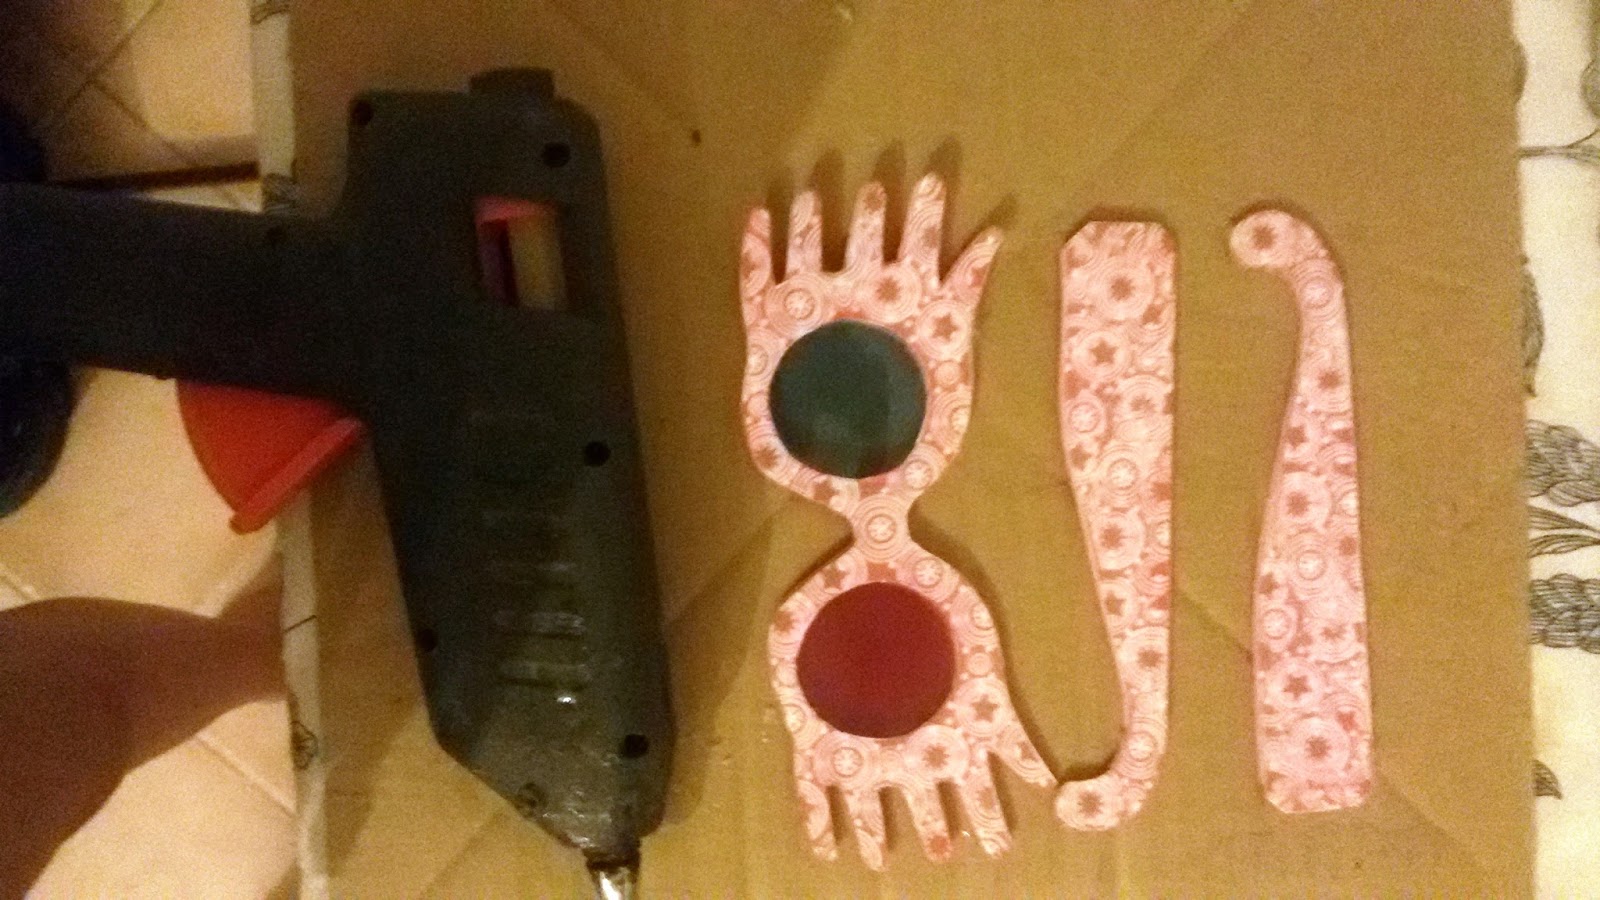
 Here are the Spectrespecs and the fabric. The Spectrespecs are made from paper, card, craft foam, plastic, cellotape, and a lot of glue. 
 1) Start out by printing the template: http://0.tqn.com/d/diyfashion/1/S/n/K/-/-/spectrespecs_large.jpg 
This is the one that I used. Glue it to a piece of card.

2) Next, cover the printed Specs with sticky-back plastic, contact paper, or strips of transparent packing tape. This helps to protect the surface and make it shiny. Cut it out
 3) Use the cardboard cut out to trace the pattern on to craft foam. When cutting the foam, cut a little inside the lines so that the foam isn't bigger than the outside of the Specs. This is also a good time to cut out the lenses. Use the lens holes on the specs to help you trace a circle, but make the plastic circle a little bigger than the lens hole: this will help you to glue it in. I cut circles from a Fanta bottle (blue Fanta = elderflower. Hungary loves elderflower. And rosehips.) and a laundry detergent bottle (surprisingly hard to find red plastic bottles that are also transparent). You could use cellophane to get a similar effect.
Cut out the plastic.
 4) If you want to reinforce the Specs' arms with foam, cut off the little piece at the end. This will make it easier to bend the arms. 

5) Glue in the lenses with a strong glue. I used hot glue.

6) Glue foam on to the back of the card pieces.

  7) Next, the arms. Score the line of the tab and fold it. Decide how you will position the arms on the main part of the specs. Make sure you'll be able to fold and open the glasses. Glue down the tabs with a strong glue.
 9) Ta da. Finished spectrespecs.

I didn't want to make an exact replica of any of Luna's costumes from the films. Instead I thought I'd try an original design. I found a pair of satin pyjamas with a lovely print: dark blue background with gold/yellow stars. I thought that would be perfect for Luna's personality. The colours are also quite reminiscent of Ravenclaw. I painted a few designs (sorry for the camera quality: my phone was not cooperating), and I'm trying to decide which is the most "Luna" like. Feel free to make suggestions on which design is best for Luna. 

1. Empire line, with gold netting ruffle
2. Empire line, with gold trim, and ruffle
3. Darted bodice, with gold netting ruffle and gold straps
4. Darted bodice, with ruffle on hem and gold trim
5. Empire line, with simple sleeves