Showing posts with label goth. Show all posts

Sunday, January 2, 2022

Black and White Stripes: Part 2

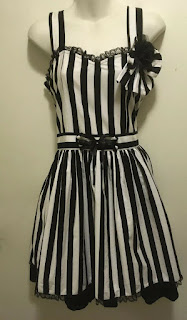
 I made a few alterations to my striped dress. I added an extra panel to the back bodice, and added shirring. This shirring is quite basic: I didn't want to use elastic thread or make casings, so I just stretched out elastic and sewed it on with a zigzag stitch. It's not as neat as the other methods, but when the elastic wears out, it will be much easier to replace. I had to adjust the skirt and remove some of the gathers in order for the skirt and back panel to be the same size.

There's also lace sewn to the neckline and the black ruffles.

I added a belt. This is made from scrap material. The front is interfaced, and the back is just a single layer of fabric with hemmed edges. There's a little bit of black lace in there too. It ties at the back.


Made a little bow to go with my dress. I used scraps and some interfacing. There's a safety pin sewn on to the back.


Saturday, January 1, 2022

Black and white stripes: Part 1

 My last sewing project of 2021 was something I wanted to make for a while: a black and white striped dress. My hair is currently bright green, so the chance to look like Beetlejuice was to good to miss. Of course, I decided to sew it in less than 24 hours, hours before the small celebration we held. 
My inspiration is the BtSSB's Kuranosuke Stripe JSK. I saw this dress years ago on F Yeah Lolita's blog, and had always liked it (this original post about the dress is here http://www.fyeahlolita.com/2010/12/btssbs-kuranosuke-stripe-jsk.html ). The actual JSK is out of my budget, and I don't really wear lolita fashion in any case, but I liked the basic idea.

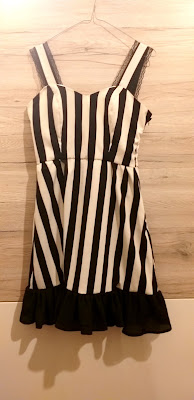
I bought these two dresses on facebook marketplace to use to sew this dress. As I had limited time, I simplified the design somewhat. The striped dress forms the main part of the dress.
I used this black dress too. I removed the bottom ruffle to use on the striped dress. What remained makes a nice blouse. 

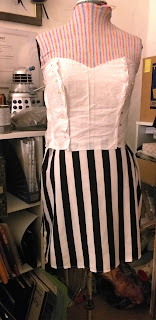
I used a Burdastyle bodice pattern. I need to resize this pattern because it was very tight. I cut the lining from white cotton. After taking the striped dress to pieces, I had to take some time to place the pattern pieces to make sure that the stripes would line up properly when I sewed it. It was worth taking this extra time on this part of the project, because I really like how to stripes on the bodice look. 


I cut the ruffle from the black dress, then cut it until it was the right width and length. I had to measure multiple times to make sure that theskirt would not be too long, as I wanted it to be just above the knee. I gathered the black fabric into a ruffle, then pinned it to the dress. It was tricky to pin the ruffle on, but once it was n place I sewed it on with a straight stitch. 

I made a lining layer for the skirt from some white acetate. It's not the prettiest but since it's hidden under the skirt, I don't mind too much. I match up the stripes on the front of the skirt and bodice, then gathered the rest of the skirt to fit the bodice. I also added an invisible zip to the side seam. 
I made the straps from leftover striped material, and lining them with black cotton. Rather than top-stitching the black lace on, I sewed it between the striped material and the lining. 

I handsewed the bodice lining closed at the waist and along the zip, and the dress was done. 

The dress looks lovely. It will need altering, because the bodice is really tight. The plan is to add a panel of shirring to the back. I'm also thinking of adding the black bustled panel to the skirt. The skirt isn't full enough to be proper lolita, but it would be nice to add a little more volume. 


Thursday, August 16, 2018

A dress made from curtains


I was invited to a small photoshoot, and needed a white dress to wear. I didn't want to buy one, and I need to use up my fabric stash . . .so to kill two birds with one stone, I made a white dress using cloth that I already had. This dress is made from old curtains and old sheets. The bodice and lining are made from white cotton. There's a poly-organza overlay on the bodice that came from an old curtain. The skirt is made from a very thin white cotton that was originally a curtain. I was trying to make a gothic style dress, but I think it might need more embellishments.
If I make a similar dress in the future, I'll make sure that the bodice fits me better. It was slightly too large, so that straps and back gaped a little. I'd also like to make the seams at the neckline neater; I think I need a facing for this style. I am quite happy with the gathered skirt though, and I like how it looks with the belt on top. 

Friday, October 24, 2014

Gothic Satin and Velvet Skirt and Bustier

I always wanted to try my hand at a gothic dress. I was partly inspired by doxiequeen1's gothic dress: http://doxiequeen1.wordpress.com/2014/10/09/making-a-glittery-gothic-dress-part-two/ , and I also had some nice fabric I wanted to use. I bought a satin dress from 50c in a charity shop. It had a gorgeous pattern, something like a brocade material would have. I looked on the internet for inspiration, and decided to make a satin skirt, and a satin and velvet bustier. Originally this was going to be a one piece dress, but I thought two pieces would be more versatile. Unfortunately the bodice doesn't fit me very well: it's just a bit too loose; so I'm selling the outfit on etsy: https://www.etsy.com/listing/208400395/black-goth-skirt-and-corset-top?ref=shop_home_active_2 
Here are all the bodice pieces. I used two layers: fashion fabric, and twill as a strength layer. Corset type tops need a strength layer due to the stress of being laced shut. Without the strength layer they can rip. 

The first step was assembling the bodice. This is based on a Burdastyle pattern. I pinned everything together carefully and sewed it. I then added boning channels using scraps of cloth: you can see the channels in the picture on the right.

Once the strength layer was ready, I started on the fashion layer. The central panel is satin with interfacing, and the rest is velvet. I was very lucky because I already had all the fabric that I needed. I had a piece of black velvet left over from Harley Quinn, and it was just big enough for this bodice.
My cat Pearl (it's the name he came with; I wanted to call him Othello but he wasn't interested) came in to help. I try to keep him out of the room when I'm sewing in case he swallows thread or gets pricked by a needle. It's surprisingly common for cats to swallow needles, thread or both.
 The final stage was adding grommets to the back. I use grommet pliers to set them. they're not as good quality as hammered grommets, but they do look nice.
The skirt was a little tricky to make. I didn't have very much fabric to work with. I could have been lazy and made a gathered skirt, but I knew that a circle skirt would have a nice drape. I found this amazing website that helps you calculate the radius of your circle skirt and how much fabric you'll need: http://byhandlondon.com/pages/circle-skirt-app . I drafted a half circle skirt in two pieces. I made the front shorter than the back, added some side gores for volume, and then added the curve in the front.
The rest of the process was quite boring. I sewed everything together and also sewed bias tape along the bottom, then hemmed it. I made a very simple gathered skirt to act as a lining. Finally I added a waistband and zip.  


Monday, August 18, 2014

Grey Hooded Dress


Ever since I saw this picture on Mookychick (http://www.mookychick.co.uk/indie-fashion/gothic/white-goth-clothing.php) I've wanted to make a hooded dress. It's such a great concept: practicality meets cuteness. I also had some patterns that were perfect e.g. Burda's Danielle Pattern http://www.burdastyle.com/pattern_store/patterns/danielle

Initially I wanted to make a white dress, similar to the one in the photo, but I had absolutely no luck finding suitable material. I looked at so many different white pieces of cloth, then I stumbled upon this strange material on the clearance table. I don't even know what kind of material it is.

It's very stretchy but also seems to be woven, and frays a lot. It has a texture like brushed cotton on one side. The material also has an ombre effect, going from light to dark grey/purple (actually, it's a grey similar to the colour of Homura's skirt in Puella Magi Madoka Magica). It's very comfortable against the skin, and I like the pattern. It was something like 8 Euro for two generously sized pieces, which is a bargain in my book.

I used McCalls 4491 (I think) for this pattern. 4491 is actually a Medieval style dress, but it has a gorgeous princess seam. The trouble is that it is actually much larger than the sizes states, so I had to take it in by at least 10cm on each side. Crazy alterations aside, it has a lovely shape.  

After sewing the seams, I altered the neckline. I sewed the side seams last because I wanted to add pockets (what's the point of a dress without pockets?). Once the pockets were in I sewed up the side seams and finished all the edges with a zigzag stitch. The dress was too long, so I took it up and hemmed it so it's now just above my knees.

The next step was one that I forgot to photograph. I needed to finish the neckline and armholes. The armholes were simple enough. I made some bias tape and sewed it around them. I tried to do the same with the neckline, but disaster struck. The neckline went all wavy and looked stretched out and nasty. I rescued it by turning it under and hand sewing it down. It now looks a lot neater.

The last step was adding a hood. I traced one from a hoody and cut it out. I placed the hood pieces right sides together and sewed them, leaving a small gap. I turned the hood right sides out, sewed the gap shut, and top-stitched to keep everything in place. Finally I used snaps to attach it to the dress, so I have the option of wearing it without a hood.
I'm very pleased with the final dress. It looks smart and really suits me. I do want to know what went wrong with the neckline, and why it went all wavy when I sewed on the bias tape. If anyone has any tips, please share them with me. 


Sunday, August 10, 2014

Retro Catwoman Part 2: Bustier and Accessories

The Catwoman costume is done, and in a very short amount of time; maybe a weekend tops?

I used a Burdastyle pattern for the bustier. I should have made a mockup, because it is a little large for me. Also, when the pattern instruction tell you to cut the boning shorter, you should do that, because the bones interfered with the top stitching. And maybe hot pink lining wasn't the best idea. Despite this, I'm very pleased with my first cupped bustier.
 It's not a Catwoman costume without some kind of cat ears. I used pleather scraps to make these ears, then glued them on to a head band. 
To complete the costume, I bought some goggles from ebay seller asvpshop. 
http://www.ebay.co.uk/itm/251052896650?var=550261164716&ssPageName=STRK:MEWNX:IT&_trksid=p3984.m1439.l2649
I order a pair with red lenses. I was actually surprised that they came with two pairs of lenses: one black, one red. The lenses were a bit dirty; I think I need to scrub them with glasses-cleaning spray or similar.
 They fit very well, and are great for this costume,though I think I will wear them up on my head because seeing everything through a red haze is quite strange.


Rat Queen completed

The costume is mostly finished; I just need to finish a few accessories (tights and gloves). 


Let's go through it piece by piece:

The Corset
This corset is made from pillowcase material and cotton sateen. It is definitely not designed for tight lacing. I used katafalk's tutorial to draft the pattern. This is the first time I've used a busk in a corset. Busks are a bit tricky to insert, but make it a lot easier to put the corset on. I used Bishonenrancher's video tutorials as a guide, and ended up with a piece like this:
I then sewed the fashion layer and strength layer. Note that I flatlined the grey cloth to a stiffer cloth before I started sewing all the pieces together.
Here's the corset with all the pieces sewn together. I think if I make this corset again I'll make the back lower.
The corset on my dress form. You can see here that I sewed in the boning channels, adding the plastic bones, then sewed on bias tape to finish the raw edges. Once that was done I added grommets to the back.
This is the basic corset finished: the front
the side
and the back. I added a modesty panel to hide the gap.
The next step was to decorate the corset. Emilie's corset is covered with rhinestones, chains, beads, sequins, and charms. I bought a bunch of these from ebay and glued them on with E6000. I began by sticking on the larger gems in a regular pattern, and using the smaller gems to fill in the gaps. Once that was done I sewed on the chains with embroidery thread, and added the key charm to the chains with jump rings.

Here's the finished corset, with the modesty panel attached. I think adding the embellishments was my favourite part of making this corset.
I still have a ton of gems left over, so I'll probably make some gem encrusted accessories to sell in my etsy shop and at Malta Expo.


The Wig
I didn't end up dying a wig after all. My friend wants me to play Fionna (Adventure Time) in a skit, and I need a long blonde wig (we're doing Good Little Girl/Bad Little Boy). I bought a wig from cosertstudio on ebay.uk
http://www.ebay.co.uk/itm/70CM-Long-Wavy-Dark-Red-Men-Women-Anime-Fashion-Halloween-Cosplay-Hair-Full-Wig-/111192550820?ssPageName=ADME:L:OU:GB:3160
Coserstudio is a really nice seller. They asked me whether my item had arrived on time, and were generally very helpful and polite. The wig did arrive a little bit late, but only by a few days. I always order wigs in advance so that I don't have a panic before the convention.
The wig is a little bit shiny, but it fits well, and the colour is perfect. I might curl the ends slightly, but overall the wig is just right for this costume.

Bra
I bought this bra from ebay. It's exactly what I need, and has great details like the stitch lines and the black lace. I sewed in some padding in the cups for modesty, and glued on the gems with E6000 glue. And that's how you make a sparkly bra.