Showing posts with label reconstruction. Show all posts

Sunday, April 21, 2019

Easter Sewing Projects

Long time no see, eh?
Vet school means very little time for sewing and cosplay, but I did manage a few projects during the Easter holidays.

T-shirt reconstruction:

I altered my Deadpool shirt fron Qwertee, following an old Threadbanger tutorial that Corinne did years ago. 


I followed another one of Corinne's t-shirt reconstruction tutorials and altered this goat t-shirt: it was an XL before.
 I also altered these black t-shirts to give them a cold-shoulder design. I made patches based on the sigils from Game of Thrones, and sewed those on for decoration. 

I made a little waist pouch for days when I want to wear leggings or skirts without pockets. The pouch is made from fake suede (originally part of a curtain) and closes with a zip. There's a plastic buckle at the back, and I used webbing for the belt. 


 Finally, I altered a tartan shirt dress that I had. It was a bit tight and I didn't wear it that often. I cut it apart and made a new bodice, using a bit of black spandex to make extra bodice panels to improve the fit. 

 The original dress had a nicely flared skirt, which I kept, but I added pockets, and some black lace to the hem. The lace originally came from an old shrug: I had picked all the lace trim off to use for another project. I used up all of the lace, and had just enough for the hem.

 I used grommet tape for the straps (this is the last of the grommet tape that I used to make my Violet Baudelaire costume!) and an old curtain ring for the back of the dress.


Thursday, August 16, 2018

A dress made from curtains


I was invited to a small photoshoot, and needed a white dress to wear. I didn't want to buy one, and I need to use up my fabric stash . . .so to kill two birds with one stone, I made a white dress using cloth that I already had. This dress is made from old curtains and old sheets. The bodice and lining are made from white cotton. There's a poly-organza overlay on the bodice that came from an old curtain. The skirt is made from a very thin white cotton that was originally a curtain. I was trying to make a gothic style dress, but I think it might need more embellishments.
If I make a similar dress in the future, I'll make sure that the bodice fits me better. It was slightly too large, so that straps and back gaped a little. I'd also like to make the seams at the neckline neater; I think I need a facing for this style. I am quite happy with the gathered skirt though, and I like how it looks with the belt on top. 

Thursday, April 20, 2017

Chie Satonaka Jacket Walkthrough


So I recently fell in love with Persona 4 (the anime; I sadly don't have time to play the game. This is the price of vet school). Chie and Kanji are probably my favourite characters. I decided that it would be fun to make Chie's costume. A lot of my costumes are quite elaborate, and I wanted a simple, comfy costume in my collection. 
I also decided to try to use recycled materials where possible. 

To this end, I went to several thrift shops to look for ideal materials to make Chie's jacket.  I settled on a men's sweater, and these two t-shirts. The sweater forms the base of the jacket, and the t-shirts are for trim and other little details. 
I thought I'd share my process with you, so here we go!

The Jacket
1) Planning: Before you pick up your scissors, study the objects you've bought, and see how you can piece them together to make your costume. I had a plan in mind before I bought my materials, but it's good to adjust your plan once you actually buy your materials. The sweater I bought had a v-neck, and was very loose, so I knew that I'd need to take it in and remove the v-neck. I also knew that I would need to remove the sleeves to add the stripes and change the cuffs.
2) Deconstruction: Once you've had a good think and decided on your plan of action, you can start deconstructing your pieces as needed. I cut off the sleeves, and removed the cuffs. I put the sweater on a dress for (though if you have a friend to help you, you probably don't need a dress form), and took in the sweater, pinching and pinning the excess fabric. I measured and checked that my line was even, and I slowly cut away the extra material.  
3) I decided to use the extra material to make the collar. In hindsight, I should have waited until I had more extra material, because my collar was a little short. 
i. Take you excess material (cut from the front of the sweater in my case) and lay it out
ii. Cut out strips of material. I made mine 2.5cm wide (+seam allowance).
iii. Sew them together. I used a sewing machine and used a small zigzag stitch. Sew lots of these pieces together: it's better to have too many and to cut the collar to size later. 
iv. Once you've got a nice big piece, measure  and cut another piece of material that is the same width and length as your sewn-together strip. I used the green t-shirt material: it will be hidden when the jacket is done so it doesn't matter too much.
v. Turn your tube of material right side out: you now have the basic collar done. 

4) Before I attached the collar, I decided to create the light green design on the front of the jacket. I used masking tape and chalk to map out the position of the patch. Once it looked right, I carefully peeled off the masking tape and stuck it to some paper to make a template. I added seam allowance and copied it on to my fabric. I also drew the template on to the jacket and cut out that material (leave seam allowances!). I used my overlock machine to sew on the light green fabric, but a sewing machine would work just as well. 
5) The Collar: I pinned on the collar and sewed it on. You can use a zigzag stitch or an overlock for this part. 

6) Time for bias tape. To make this, I drew lines at 45 degree on the yellow t-shirt fabric. I cut long strips. Make them a little bit wide, just in case. Then I fold over the edges and ironed them over. Ta da, bias tape!

7) Now let's sew on the bias tape. It will be used as trim for the front of the jacket and on the sleeves. Open up the bias tape, and face it right sides together with the jacket along the front edges. Pin it down and sew it on. Then I folded the bias tape over the edges, and hand stitched it down using a slip stitch. Sew up the sleeve and turn it right sides out. Once I was done, I ironed the edges to make it look crisp and neat. 
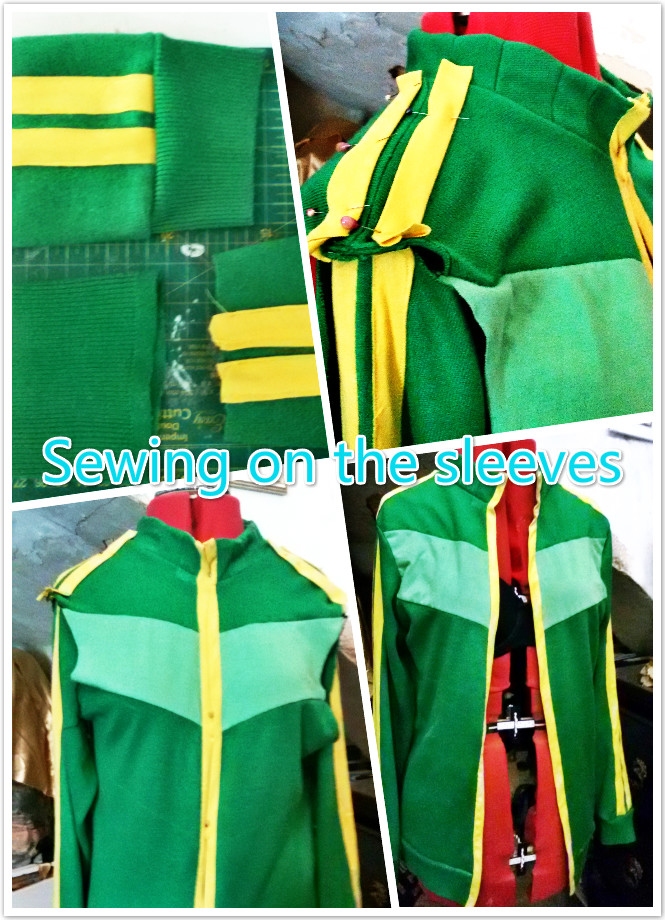
8) Sewing the bias tape on to the sleeves was a little more difficult. If I had to do this again, I would get hold of some hem tape or good fabric glue and stick the tape down first to stop it from sliding about. Firstly, I found the centre of the sleeves, and marked out where I wanted to put the yellow stripes, using chalk and a long rules. I then pinned the stripes in places and carefully sewed along the edges of each stripe. Once the stripes were sewn on, I sewed on the cuffs.

 9) The stripes on Chie's jacket also extend to the shoulders. To help measure out their position, I pinned the sleeve to the arm-scye, then pinned the bias tape on to the shoulder. You can get an idea of how well the stripes match up by pinning the rest of the sleeves in place. Once you are happy with how it looks, you can pin on the sleeve properly and sew it on. The seams may be a bit bulky, so go slowly as you sew.

10) The jacket is almost done. The only thing left is to add the zip. This took some time for me, as I had difficulty getting both sides to match perfectly. Take your time with this. Baste or pin the zip in place. Once everything looks good, carefully sew on the zip. I had to seam rip one section of the zip because the alignment was off. The zip was also a little too short, so I added a velcro closure to the collar. 


Congrats, you've finished your jacket. 

Monday, October 13, 2014

Bombshell Harley Quinn: A Walkthrough

Although I've already got a lot of costumes done for Expo and Malta Comic Con, I thought I'd add yet another one: Bombshell Harley Quinn. Harley is a favourite of mine, and I love this design. 

Cheap and easy, I said. Really simple to make, I said . . .

To be fair, this was not an expensive project, because I already had most of the supplies: the wig, stretch fabric, goggles, the boots etc. I only spent 4 Euro on this project: 50c on the jacket, and 3.50 on the rib knit. 

I made the stockings by stretching material around the leg and pinning it into place.
 I then sewed it up. There's elastic in the stop and bottom of the stocking. I ironed interfacing on to the black diamonds, and sewed those on by hand. The stripes were harder to do. I partly hand-sewed them, partly sewed them on with a tiny zig zag stitch on the machine.

Next was the jacket. I bought a jacket from a charity shop and took it in at the sides. I also removed the sleeves and turned the lower part of the collar under to change the front of the jacket (hope that makes sense - you can see the basting stitches on the front), and shortened the jacket.
 Next I draped fake sheepskin over the collar to get the right shape and sewed it on. There are two layers of sheepskin.I then sewed on a piece of rib knit, and them added the zip. I also added epaulettes. These are just little rectangles of fabric sewn along the shoulders.
 The last steps were to reattach the sleeves and add the patch. Easier said than done. I had to keep trimming the arm holes to get the sleeves to fit. Lots of trimming and pinning to check the fit. The patch also took a long time to do, because there was embroidery on the back of the jacket that had to be unpicked and removed slowly. The patch was made by ironing interfacing on to a piece of white fabric, tracing the design on to the cloth, and adding detail with markers and paint. Next I used a narrow zigzag stitch to sew the patch on.
 The shorts were very easy to make: just cut off the legs of some trousers. I actually had to lengthen the shorts because they were just too short.


The bra was quite simple to make: I just stretched some red jersey over on cup and sewed it down. I sewed the diamonds n top. Not totally happy with the bra; sewing on the jersey crumpled the cup a bit. The bra is a bit skimpy, so I made a tube top to wear outdoors.

 Harley has a lot of accessories, such as this belt. I made pouches and the belt buckle. The pouches are made of scraps of jersey and interfacing. I added snaps, and glued on gems for decoration. The belt buckle is made of craft foam, PVA glue, and acrylic paint. The buckle and pouches have pieces of ribbon glued/sewn on to the back, allowing them to slide on to the belt.
I originally bought this wig from Coscraft for a female titan cosplay, but it's too yellow for my taste, and a bit too long (yes, I know I could trim it, but I hate doing so). I found a tutorial on how to turn a normal layered wig into a pony tail wig, and added red hair ties. There are clear hair ties on the ponytails for a more secure hold.

Tuesday, September 14, 2010

Going Ga Ga

I've found a mini project to interrupt my Violet Baudelaire costume: a Lady Gaga costume. For Notte Bianca I will be wearing this

Luckily this v]costume is very simple. I already own a blue bikini, so the bikini top will need a little altering, then I'll applique on some stars and stripes to both parts of the bikini. I hope I have enough fabric for the back of the bikini bottoms, which are red. I have boots like the ones Lady Gaga wears in the video, but in black, I can borrow a wig, and the hairband shouldn't be too hard.


Applique will work better than paint due to the fabric of the bikini, which is slippery feeling-I don't think it will hold paint well, though I can use paint on the headband.


I sincerely hope that some other people turn up in costume.