Showing posts with label sally. Show all posts

Saturday, November 3, 2012

Sally Pictures

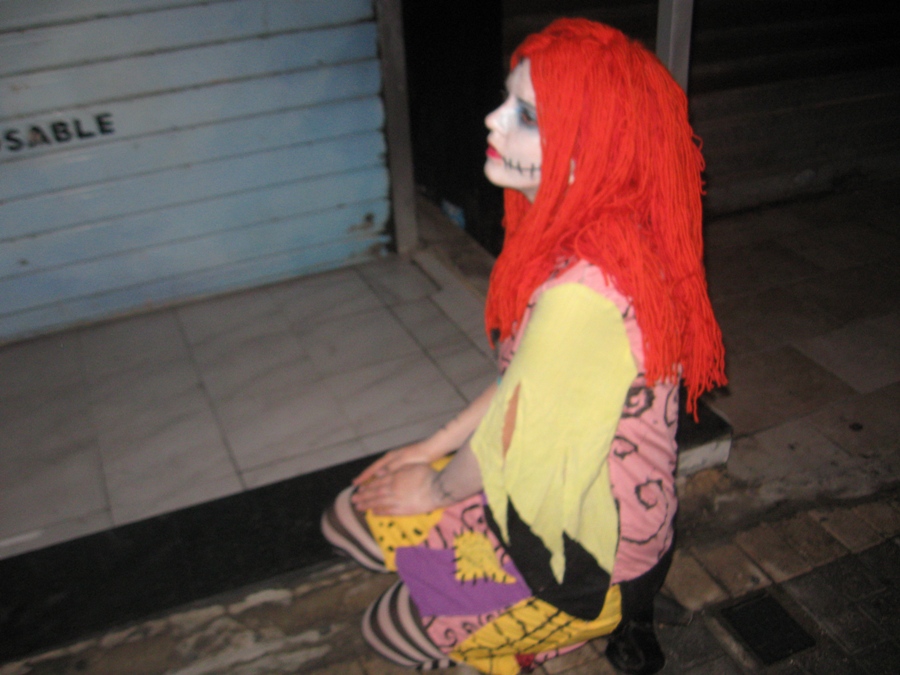
 FINALLY, I have pictures of me wearing this costume, with full makeup. They're not the best quality, but better than nothing, right?
 This photo shows my makeup quite well. The base makeup was cheap white face paint, which I am never using again because of how many coats I had to apply to get pale. I added different blue eyeshadows for the shading around the eyes and nose. The stitches are black face paint and eye liner. I used red lipstick, but next time I'll apply it more carefully.
 The only full length picture I have. The costume is not entirely accurate: I wore tights in case it was cold, and Victorian style boots.
The wig looks glorious. It was quite easy to put on, and it stayed on WITHOUT hair pins.
So that was my Halloween. How was your Halloween? What did you wear?

Friday, September 21, 2012

Sally Wig: Completed!


 Yay! The wig is completed.


I had to buy another ball of wool to hide all the bald spots. This at least gives me an idea of how much wool I'll need if I do this again (around 100-150 grammes). As well as sewing wefts in, I also knotted a few of the strands in.

This wig looks pretty good, in my opinion, and I think if I do another Burton stop-motion type character, I'll use a wool wig.

Would anyone be interested in a tutorial of this?

Wednesday, September 19, 2012

Sally wig: The Yarn variant

 My old Sally wig was a bit of a disaster: cheap party wig forced into dreadlocks. That wig has been scrapped (and bits of it used to stuff some adorable purple owls), and I've made a new one. 
 This wig is made of three balls of yarn, sewn to a cap made from an old pair of tights. I made wefts out of the wool, and sewed them down the centre. I think I'm going to need more wool though, because when the wig is on, the yarn falls back and leave huge gaps where you can see the leopard spotted cap.
These are the wefts. To make them, I cut the wool to size (wrap it around a pillow until the ball runs out, then cut it off the pillow). Nest I laid down a piece of masking tape, on top of which I placed a strip of tulle. i then squeezed a line of glue along the tape, and place the wool down. Next I added another line of glue, and used a piece of plastic to spread out the glue. I then placed another strip of tulle on top of the glue and wool.
 Apart from the bald spots, I'm quite satisfied with this experiment. I was thinking of creating a Rapunzel wig using the same method (it would save me a LOT of money)
When the wig is less bald, I'll post some better photos. 

EDIT: I think I've solved the problem. I looked at some of my wigs, to sew the layout of the wefts. There's a section sewn down down the centre front, then the other wefts are sewn in horizontally. So I removed two of the wefts and sewed them on horizontally, and it worked like a treat: the wig looks much better. I also tacked down some of the wool on the front, to stop it from sliding back.
 Here's the tacked down front section.
 Here are the newly positioned wefts.

For anyone who is interested in making their own yarn wig, here are some tutorials.

Friday, December 23, 2011

Not A Tutorial: Sally's Patchwork Dress Part 2

Notes on the last tutorial:
Instead of sewing the base dress together, I would recommend trying to sew the patches on to the dress pieces first, then sew the dress together. It was very difficult to pin down the pieces (I found that putting an A3 folder inside the dress helped to strech out the cloth, which made pinning easier).

Step 1:
Once everything is sewn down, sewing the dress up. If you are adding a zip now is the time to do it. My neckhole is actually large enough for me to get into the dress without a zip, so I didn't bother using one.

Step 2:
If you want to hem the dress, go ahad and hem it. To hem my dress, I turned the outer layer and the inner layer in towards each other. This sandwiches the raw edges between the fabric when it is sewn shut. For a more ragged edge you can sew a zip zap stitch along the hem.
Here's what it should look like.
Step 3:
Decorate. Add the stitches on the dress with paint or a permanent marker.

Step 4:
Time to make the sleeves. I used a sleeve pattern that I had in my collection of patterns, but if you want a very ragged finish, you can simply sew a strip of fabric around the arm hole. I wanted very ragged sleeves, so I only sewed a zig zag stitched on the part of the sleeve that would be sewn to the dress.
You should get something like this.
You can make the sleeves shorter or more ragged.
And you're done.

This is a really good project if you want to experiment with various techniques, such as applique, patchwork, dying (I dyed the yellow sleeve in turmeric), painting and printing. Just throw on some white tights, stripy socks and a yarn wig, and you're Sally.

Hope you enjoyed the tutorial.

Tuesday, December 6, 2011

Not A Tutorial: Sally's Patchwork Dress Part 1

Since this is the season of loving and giving, I'm going to show you how to create Sally's dress from 'The Nightmare Before Christmas' .
My process is quite messy and disorganised. Making this dress taught me a lot, so my method will probably seem a little confusing if you're a beginner.
I'm basing my design on this doll; however you can make this dress out of whatever material you wish. This dress is a very good way of using up scraps of cloth, so dive into your rag pile and start sewing.

Step 1: The Base Dress
Front

Back
I'm assuming you know how to sew basic items of clothing and how to use sewing patterns. I made a base dress from an old sheet and some random cloth, using a pattern from Burda Style magazine (for free patterns that you can print at home, go to burdastyle.com ). Make a simple shift dress (or find an old dress that you don't wear anymore if you want to save time). If you are making your dress, you should leave the front or back open: it makes it easier to sew the patchwork if you can flatten out the base dress. My dress will have an invisible zip in the front to make it easier to get in and out.

Step 2: The patch marking
I'm working on the wrong side of my dress. This is because when the wrong side is covered in patches, the raw seams will be covered. You can work on the wrong or right side of the dress.
Use chalk or a marker to draw the shapes of the patches on to the base dress. This is a good guide for the placing and size of the patches.

Step 3: Patches
Trace the shapes you drew on your base dress on to your patch fabric. I used carbon paper and a tracing wheel to do this. You could also use tracing paper. Do this slowly: I prefer to cut out my patches as I go along, rather than making all the patches at once. You're less likely to make mistakes this way.
Once you have a few patches cut out, decorate them.

You can have a lot of fun with these patches. I appliqued the black spots on to the turquiose cloth. The black stripes were painted on with acrylic paint. If the patches aren't the right colour, try dying them with natural dyes to get the earthy quality of Sally's dress: try this tutorial

Step 4: Sewing on the patches
Line up the edges of the patch. I started with this patch because it was easy to match up the arm-scye and collar edges. Fold the seam allow of the patch under. I had to turn the seam allowance of the base dress collar and arm-scye under as well, to match them up with the yellow patch. Pin it down. When you are finished pinning, the raw edges of the patch, and the raw edges of the base dress should be hidden.

To clarify: turn under the edges, then match the base dress and the patch. This traps the raw edges between these layers of cloth.

Sew around the edge of the patch. You can match the colour of the patch, or use black thread for contrast.

Step 5: Keep adding patches

Continue to pink and sew down patches, always remembering the fold the raw edges of the patch under-unless you want your dress to look ragged. When sewing pieces that go around them hem, do not sew the bottom or side of the patch. Simply secure the top of the patch. This will help you create the jagged hem of Sally's dress. 

. . . To be continued . . .