Showing posts with label lolita. Show all posts

Sunday, January 2, 2022

Black and White Stripes: Part 2

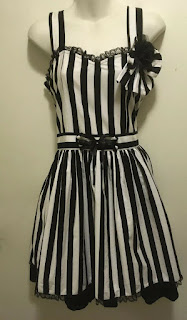
 I made a few alterations to my striped dress. I added an extra panel to the back bodice, and added shirring. This shirring is quite basic: I didn't want to use elastic thread or make casings, so I just stretched out elastic and sewed it on with a zigzag stitch. It's not as neat as the other methods, but when the elastic wears out, it will be much easier to replace. I had to adjust the skirt and remove some of the gathers in order for the skirt and back panel to be the same size.

There's also lace sewn to the neckline and the black ruffles.

I added a belt. This is made from scrap material. The front is interfaced, and the back is just a single layer of fabric with hemmed edges. There's a little bit of black lace in there too. It ties at the back.


Made a little bow to go with my dress. I used scraps and some interfacing. There's a safety pin sewn on to the back.


Saturday, January 1, 2022

Black and white stripes: Part 1

 My last sewing project of 2021 was something I wanted to make for a while: a black and white striped dress. My hair is currently bright green, so the chance to look like Beetlejuice was to good to miss. Of course, I decided to sew it in less than 24 hours, hours before the small celebration we held. 
My inspiration is the BtSSB's Kuranosuke Stripe JSK. I saw this dress years ago on F Yeah Lolita's blog, and had always liked it (this original post about the dress is here http://www.fyeahlolita.com/2010/12/btssbs-kuranosuke-stripe-jsk.html ). The actual JSK is out of my budget, and I don't really wear lolita fashion in any case, but I liked the basic idea.

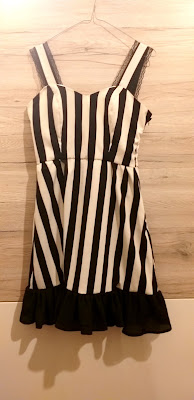
I bought these two dresses on facebook marketplace to use to sew this dress. As I had limited time, I simplified the design somewhat. The striped dress forms the main part of the dress.
I used this black dress too. I removed the bottom ruffle to use on the striped dress. What remained makes a nice blouse. 

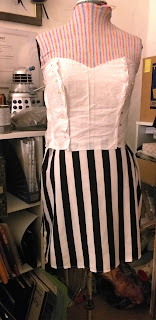
I used a Burdastyle bodice pattern. I need to resize this pattern because it was very tight. I cut the lining from white cotton. After taking the striped dress to pieces, I had to take some time to place the pattern pieces to make sure that the stripes would line up properly when I sewed it. It was worth taking this extra time on this part of the project, because I really like how to stripes on the bodice look. 


I cut the ruffle from the black dress, then cut it until it was the right width and length. I had to measure multiple times to make sure that theskirt would not be too long, as I wanted it to be just above the knee. I gathered the black fabric into a ruffle, then pinned it to the dress. It was tricky to pin the ruffle on, but once it was n place I sewed it on with a straight stitch. 

I made a lining layer for the skirt from some white acetate. It's not the prettiest but since it's hidden under the skirt, I don't mind too much. I match up the stripes on the front of the skirt and bodice, then gathered the rest of the skirt to fit the bodice. I also added an invisible zip to the side seam. 
I made the straps from leftover striped material, and lining them with black cotton. Rather than top-stitching the black lace on, I sewed it between the striped material and the lining. 

I handsewed the bodice lining closed at the waist and along the zip, and the dress was done. 

The dress looks lovely. It will need altering, because the bodice is really tight. The plan is to add a panel of shirring to the back. I'm also thinking of adding the black bustled panel to the skirt. The skirt isn't full enough to be proper lolita, but it would be nice to add a little more volume. 


Monday, March 3, 2014

Wayward Victorian Carnival Costume

CARNIVAL is here! It's a big thing in Malta. Really big. The capital city is flooded with huge parade floats, street stalls and people in costume for 4 days. I went yesterday with some friends. The day before, I realised I didn't have a costume (though actually if I'd thought about it I could have worn the Amanda Young costume. Stupid stupid :( ), so I decided to put one together.

I love Emilie Autumn's style, and so I decided to put together a wayward Victorian inspired costume, partly inspired by this costume that Emilie Autumn wears:


I made a corset, though honestly this is more like a mockup than the real deal. This was made in a hurry for today, so I only spent around 12 hours working on it. This is not my best work. 


The corset is quite wrinkly. That’s because I used interfacing on the white material to stop it stretching, but the material is trying to peel away from the interfacing under stress. 
The plastic boning is also not working. This is a fashion corset and not meant for tight lacing, which is why I used plastic. I’ve had good results before, using plastic ties (you find them around furniture boxes or six packs of water). The kind I used this time is just too flimsy. It buckles under stress, which is another reason why the corset looks so rumpled.

I also had problems sewing the boning channels. I am terrible at sewing the channels neatly: they always seem to get wrinkled or misaligned, or they’re too narrow. The bias tape is also wonky, though it doesn’t show too much.

Since I used only materials that I already had at hand, I don’t feel too badly about this corset being unsuccessful. This is something I would definitely like to try remaking, ideally using more durable materials such as coutil or cotton twill. It’s difficult to buy metal corset bones in Malta, so thick cable ties will have to suffice. It might also be worth adding a waist tape and busk closure. 
 The rest of the costume is just clothes I already had, such as the jacket from Late but Lucky, a steampunk style skirt, lace gloves, a feather fascinator, boots, thigh highs and a random flower hair clip. 


Tuesday, July 9, 2013

Making Steampunk Stripes: Part 1

I have a minor problem: too much cloth! It's sitting on my shelves wrapped in plastic cases, waiting to be used (I sound like Eddie from Absolutely Fabulous: 'Battery clothes!').
So I'm trying to use it up rather than buying more material. I had quite a lot of striped material left over from making my Um of Umbridge costume, and wanted to use that. I really like Emilie Autumn, so when I found this photo of her, I wanted to try and emulate the dress she was wearing:

I also wanted to try making some steampunk clothing, since the only steampunk outfit that I own is up for sale. I did a bit of research, and found some nice striped steampunk outfits for inspiration:

I came up with a rough design, mostly based on Emilie Autumn's dress, with a fitted bodice and a voluminous skirt, though much shorter than Emilie's (knee length). 

The bodice is based on a Burdastyle wedding dress pattern from March 2011. It has a princess seam and a dip in the front. I made the neckline much lower, since it was too high and constrictive for me.
Cutting out the stripes so that they made a continuous pattern was difficult. I managed by using the pattern pieces and laying them over the cloth. I then marked where the stripes were, and arranged the paper pieces until I knew where I wanted to the stripes to be. I then laid the paper pattern pieces over the cloth so that my markings matched the stripes, and traced around my paper pieces.

Next came the skirt. I didn't have enough material to make a circle skirt, so I decided to make a gathered skirt. Gathered skirts are very easy: you just make one long rectangle, and gather it until it fits the waist of the bodice. Mine was a little more complicated because I wanted to add side pockets. I ended up cutting my material like so:
The pocket pieces were attached to the cloth pieces, and sewn together to make pockets. Once the pockets were done, I sewed up the sides, leaving the top of one side partially open so that I could attach the zip.
I then gathered the skirt by hand (my machine doesn't gathered very well), and sewed it to the bodice. I made sure that the stripes aligned nicely before I sewed everything.
Once skirt and bodice were sewn together, I attached some black lace to the hem of the skirt.

Since the striped fabric was slightly transparent, I made lining layer from thin white cotton for the bodice, skirt, and sleeves. The skirt lining is a half circle skirt, because having a gathered lining and gathered out material would create bulk at the waist.

Attaching the lining was slightly tricky. First I attached the invisible zip in the side of the dress. Next I put the lining inside the dress, so that the wrong sides of outer and inner layers were touching, and pinning everything in place. I hand sewed the lining layer to the zip. 

To make the sleeves, I took a normally sleeves pattern, and divided it in six. I cut it into six pieces. Next I cut out inch wide rectangles the same length as my sleeve. A rectangle piece was inserted between each piece of sleeve, to create a puff sleeves, like this: 
 The green pieces are the inch wide rectangles that I inserted into the sleeve pattern. I  gathered the sleeves (and the lining sleeves), sewed them to the bodice, and gathered the lower end of the sleeves. A band of black material was sewn around the gathered edge. I used it like bias tape to hide any raw edges.

To make the dress look more Victorian, I created a fake placket for buttons, then sewed some buttons on. The buttons are handmade from Polymer clay and paper clips. You basically create the shape of your button, twist a section of paper clip into a V shape, and stick it into the clay, then bake it.
Difficult to see them, but they're there.

So far, I really like this dress. It looks pretty, and has pockets! It also seems to fit very well. I need the lace trim I bought from ebay to arrive, so I can add it to the neckline. I'm also thinking about accessories. I have a hair band with rooster feathers and a pearl which might look like, but I don't know what to do with my hair. I was also thinking of making a choker and some arm warmers (Pink Absinthe's shop has some lovely pieces, though I can't afford them at the moment). I've got some nice tights and boots that would look nice with the dress.

Any thoughts on steampunk accessories?

Thursday, August 2, 2012

Petticoat

What should every Alice cosplayer have in their wardrobe? In my opinion, what's more important than playing cards, bunnies and bows is the petticoat. A good petticoat gives a typical Alice dress a lovely shape, rather than that droopy look.

Petticoats are not too hard to make for the intermediate sewer, depending on how many layers you add. A one layer petticoat is just a rectangle of tulle gathering to the right length. Anything over two layers is a lot trickier.

I have two Alice cosplays in my wardrobe already, and am planning a third, so I will be needing a petticoat. The only petticoat I had was one I made nearly a yea ago out of very soft tulle, which is not the ideal material. I also made the mistake of using chunky elastic for the waistband, which made the petticoat very chunky: it just didn't sit comfortably under my dresses. So it was time for a new petticoat. Besides, I had loads of tulle that needed to be used for something.

The petticoat is made from a mix of red tulle and burgundy tulle that i had. I made the mistake of making it from top to bottom instead of bottom to top (the latter is the correct method). Each row is made from a double layer of tulle. The waistband is a length of ribbon. The petticoat fastens with hooks and eyes, and I left a gap in the side to make it easier to get in and out of.

The bottom tier is made from 8 metres of tulle, gathered to 2 metres in len

gth to create volume. The waistband is a simple ribbon, folded over the cover the raw edges. It is 92cm at the waist, but can be adjusted to fit a waist of 75 cm.

You can order this petticoat from me. Colour, length, and material (organza, stiff tulle, soft tulle) are your choice, for 19 Euro. Extras, such as ribbons covering the seams of each tier, or an opaque underskirt, cost only 3 Euro more!
http://www.facebook.com/photo.php?fbid=390769164312040&set=a.322069767848647.69202.321767937878830&type=1&theater Contact me for more details.