Showing posts with label corset. Show all posts

Monday, January 12, 2015

Lady Loki: Walkthrough

The main reasons I made this costume:
1. I love Loki
2. There's a bunch of fabric that I needed to use up. Below is a picture o this green silk that I have. It's a bit stained, but I think that works for Lady Loki. I also had some whitish fur scraps and gold satin.

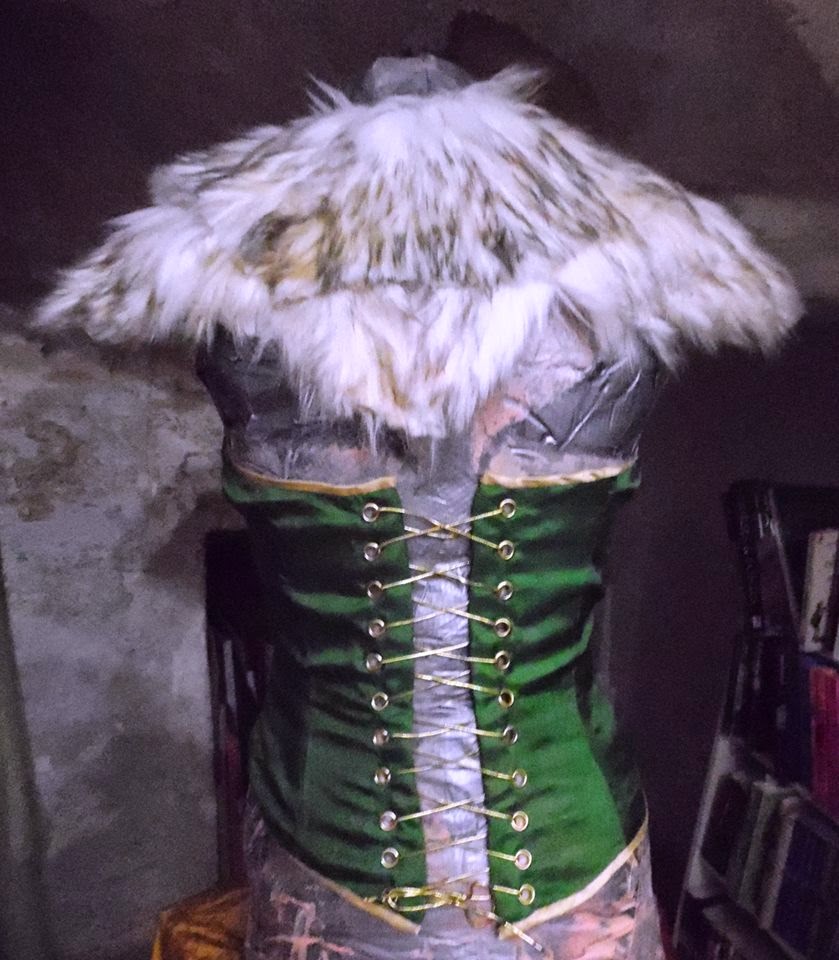
The first and simplest step was making the fur collar. i made a paper template and fiddled with it until it look right, then cut out the fur pieces and sewed them together. I made a mistake when cutting the fur by using a rotary cutter. It sliced through the hairs and now the back of the collar looks very choppy. I need to try evening it up.
Next came the bustier. This is a Burda style pattern. The lining is gabardine, and I used an old tablecloth to add structure to the bust. The bones are plastic. The outer layer is green silk.
For extra glamour, i added gold bias tape and laced the bustier closed with gold eyelets and cord. The fur collar is attached to the bustier with hooks and eyes. I forgot to take pictures, but there's also a loin cloth with this costume, also made of green silk and gold satin. I need to alter it so that it's adjustable.

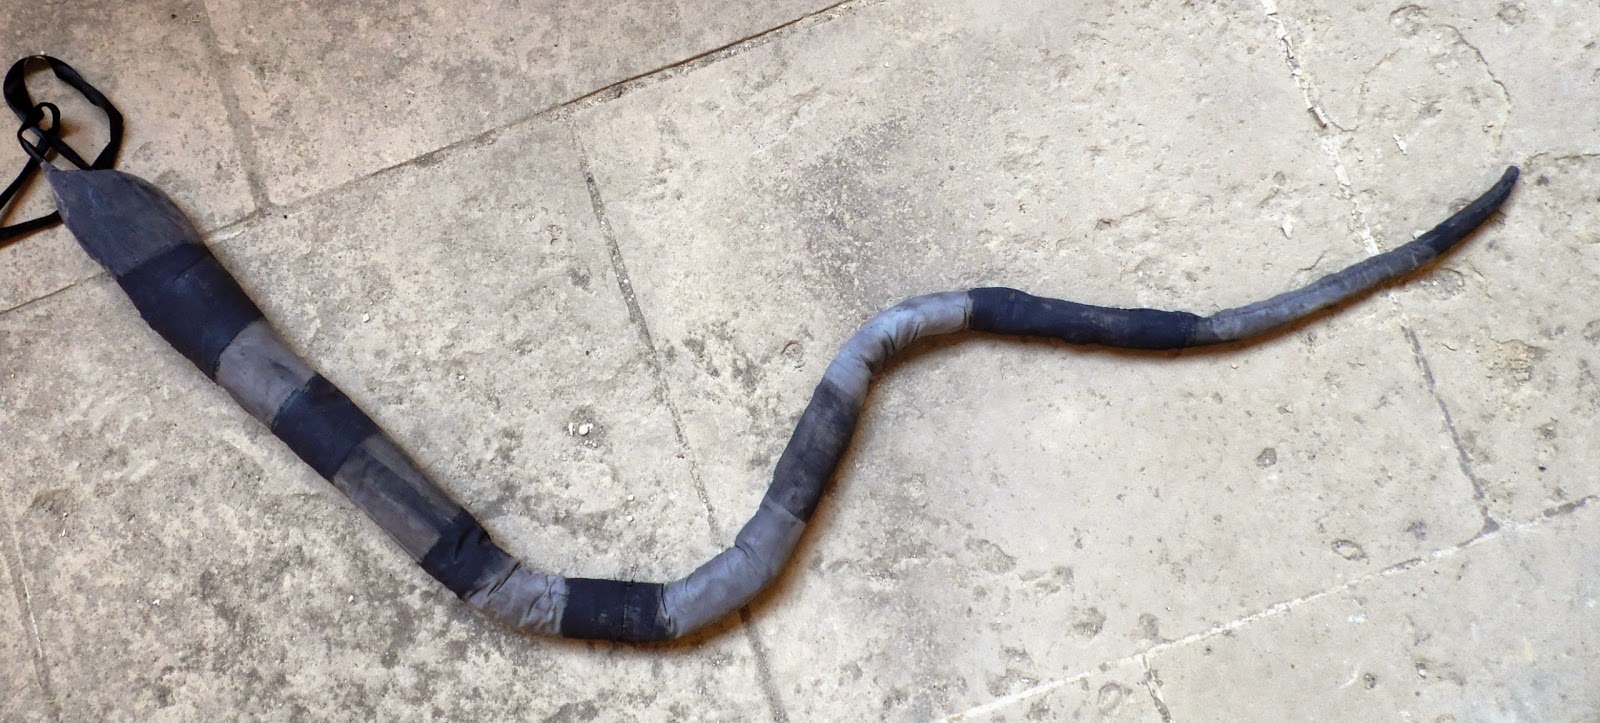
 Finally, the armour. I kept it simple: just a helm and bracers. The helm is foam, wire, cloth, paper mache, and a bit of polymer clay on the horns. There's a wire structure in the craft foam to help it fit my face. There's also wire and foam in the horns.
There's also wire in the bracers. I thought they would be able to hold their own shape, but I was worried that they would fall off. I added eyelets and ribbon to help hold them on.

This costume was also meant to include a cape, but I got lazy.

Friday, October 24, 2014

Gothic Satin and Velvet Skirt and Bustier

I always wanted to try my hand at a gothic dress. I was partly inspired by doxiequeen1's gothic dress: http://doxiequeen1.wordpress.com/2014/10/09/making-a-glittery-gothic-dress-part-two/ , and I also had some nice fabric I wanted to use. I bought a satin dress from 50c in a charity shop. It had a gorgeous pattern, something like a brocade material would have. I looked on the internet for inspiration, and decided to make a satin skirt, and a satin and velvet bustier. Originally this was going to be a one piece dress, but I thought two pieces would be more versatile. Unfortunately the bodice doesn't fit me very well: it's just a bit too loose; so I'm selling the outfit on etsy: https://www.etsy.com/listing/208400395/black-goth-skirt-and-corset-top?ref=shop_home_active_2 
Here are all the bodice pieces. I used two layers: fashion fabric, and twill as a strength layer. Corset type tops need a strength layer due to the stress of being laced shut. Without the strength layer they can rip. 

The first step was assembling the bodice. This is based on a Burdastyle pattern. I pinned everything together carefully and sewed it. I then added boning channels using scraps of cloth: you can see the channels in the picture on the right.

Once the strength layer was ready, I started on the fashion layer. The central panel is satin with interfacing, and the rest is velvet. I was very lucky because I already had all the fabric that I needed. I had a piece of black velvet left over from Harley Quinn, and it was just big enough for this bodice.
My cat Pearl (it's the name he came with; I wanted to call him Othello but he wasn't interested) came in to help. I try to keep him out of the room when I'm sewing in case he swallows thread or gets pricked by a needle. It's surprisingly common for cats to swallow needles, thread or both.
 The final stage was adding grommets to the back. I use grommet pliers to set them. they're not as good quality as hammered grommets, but they do look nice.
The skirt was a little tricky to make. I didn't have very much fabric to work with. I could have been lazy and made a gathered skirt, but I knew that a circle skirt would have a nice drape. I found this amazing website that helps you calculate the radius of your circle skirt and how much fabric you'll need: http://byhandlondon.com/pages/circle-skirt-app . I drafted a half circle skirt in two pieces. I made the front shorter than the back, added some side gores for volume, and then added the curve in the front.
The rest of the process was quite boring. I sewed everything together and also sewed bias tape along the bottom, then hemmed it. I made a very simple gathered skirt to act as a lining. Finally I added a waistband and zip.  


Sunday, August 10, 2014

Rat Queen completed

The costume is mostly finished; I just need to finish a few accessories (tights and gloves). 


Let's go through it piece by piece:

The Corset
This corset is made from pillowcase material and cotton sateen. It is definitely not designed for tight lacing. I used katafalk's tutorial to draft the pattern. This is the first time I've used a busk in a corset. Busks are a bit tricky to insert, but make it a lot easier to put the corset on. I used Bishonenrancher's video tutorials as a guide, and ended up with a piece like this:
I then sewed the fashion layer and strength layer. Note that I flatlined the grey cloth to a stiffer cloth before I started sewing all the pieces together.
Here's the corset with all the pieces sewn together. I think if I make this corset again I'll make the back lower.
The corset on my dress form. You can see here that I sewed in the boning channels, adding the plastic bones, then sewed on bias tape to finish the raw edges. Once that was done I added grommets to the back.
This is the basic corset finished: the front
the side
and the back. I added a modesty panel to hide the gap.
The next step was to decorate the corset. Emilie's corset is covered with rhinestones, chains, beads, sequins, and charms. I bought a bunch of these from ebay and glued them on with E6000. I began by sticking on the larger gems in a regular pattern, and using the smaller gems to fill in the gaps. Once that was done I sewed on the chains with embroidery thread, and added the key charm to the chains with jump rings.

Here's the finished corset, with the modesty panel attached. I think adding the embellishments was my favourite part of making this corset.
I still have a ton of gems left over, so I'll probably make some gem encrusted accessories to sell in my etsy shop and at Malta Expo.


The Wig
I didn't end up dying a wig after all. My friend wants me to play Fionna (Adventure Time) in a skit, and I need a long blonde wig (we're doing Good Little Girl/Bad Little Boy). I bought a wig from cosertstudio on ebay.uk
http://www.ebay.co.uk/itm/70CM-Long-Wavy-Dark-Red-Men-Women-Anime-Fashion-Halloween-Cosplay-Hair-Full-Wig-/111192550820?ssPageName=ADME:L:OU:GB:3160
Coserstudio is a really nice seller. They asked me whether my item had arrived on time, and were generally very helpful and polite. The wig did arrive a little bit late, but only by a few days. I always order wigs in advance so that I don't have a panic before the convention.
The wig is a little bit shiny, but it fits well, and the colour is perfect. I might curl the ends slightly, but overall the wig is just right for this costume.

Bra
I bought this bra from ebay. It's exactly what I need, and has great details like the stitch lines and the black lace. I sewed in some padding in the cups for modesty, and glued on the gems with E6000 glue. And that's how you make a sparkly bra.

Tuesday, June 10, 2014

Rat Queen Progress

Finally, exams and assignments are more or less over, and I can work on some costume projects. Currently I am trying to use up my stash, so I decided to begin my Emilie Autumn 'Rat Queen' inspired costume. I know Emilie Autumn gets very mixed press, what with accusations of her glorifying mental illness (don't think I know enough about this subject to comment) or having over priced tickets/merchandise (shipping to Malta is always expensive, so I've never actually bought anything from her, though the Asylum book looks interesting), but I love the costumes she creates, as well as her music (especially the Enchant era, but a lot of the FLAG songs are good too)
The Rat Queen is probably as detailed as a Sakizou inspired costume, though much more ragged. I've always wanted to try my hand at something Sakizou-like, so this is an ideal project. I found fantastic cloth for the corset: pillowcases on sale for 1 Euro each. I also got a lot of scraps of cloth to turn into the bustle, and those cloth strips she had round her calves, and to make the rat tail. 

Jewellery
The first thing that I made for this costume was the choker. The 'cameo' in the centre started as a pair of earrings, glued together to create this piece. I then glued some gems on top, added a key charm, and sewed it to a strip of cloth. Everything is glued on with E6000 or fabric glue.
Also made some matching earrings.

Ears
The ears began as craft foam pieces, with a dart in the middle to make them more three dimensional. 
See how much nicer they look than flat semi circles would look?
I applied several coats of PVA glue to stop the craft foam from being damaged.
Once the paint dried, I painted the ears grey.
I added embellishments using beads and gems. This photo doesn't show the extra beads that I added for more texture. The ears are now encrusted with silver beads.

Tail
The tail was made by sewing lots of scraps together to make a big rectangle. The tail pattern is a long thin isosceles triangle, folded in half and stuffed. Stuffing the tail was difficult, because you can't really poke the stuffing to the end of the tail. I ended up hand-sewing the tail shut for 10cm, then adding stuffing, then sewing, then adding more stuffing, until the whole thing was stuffed. I didn't have Dacron or similar, so used scraps of satin and some wig fibres that I had (I massacred a blonde wig, and there were lumpy unusable wefts everywhere). Using watered down grey acrylic paint, I painted the tail light grey, then used a thicker paint mix to paint on the darker stripes. Lastly I added a ribbon to tie around my waist.
Bloomers
 The bloomers are made from a single pillowcase, using this tutorial by Yiji on Deviantart. I didn't even make a pattern; I just traced around a pair of wide loose trousers to get the shape right. The stripes are pieces of lace, and I added some bows for decoration.

 Everything is elasticated for comfort. Personally, I think these are really cute.

Corset
I can't work on this properly until I buy a busk. I don't know what length to buy, because one website suggested getting a busk 1 inch shorter than the length of the centre front. I asked Lucy Corsetry on tumblr, so I'll wait for a reply and see. I think I will use plastic bones to cut down on costs; I don't intend to use this for waist training, so I think plastic bones (zip ties) will do. The pattern is based on Katafalk's under bust corset drafting tutorial  

Wig
This will be something of an experiment. I want to try dying a wig red for this costume. I have 2 wigs that might work; one is thin and a bit nasty, and the other is thicker. I will probably use the latter for the final wig, and the former for practise.