Showing posts with label sakizo. Show all posts

Friday, November 6, 2015

Malta Comic Con Photoshoot: Juliet and Fionna

Long time no update, but vet school has been taking up a lot of my time. Coupled with the fact that I don't have a sewing machine at the moment, that means I don;t have much to write about. However, I recently was able to go back to Malta. Fortunately Malta Comic Con organised a photoshoot to promote the 2015 convention, so I brought a couple of costumes along.

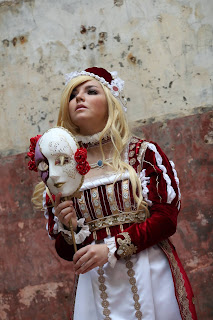
The first costume to get photos was Sakizou's Juliet.
Model: MalteseLizzieMcGee Cosplay
Photographer: Photography by Sven Farrugia https://www.facebook.com/Photography-by-Sven-Farrugia-125137150837920/?fref=ts  

The photos were taken at Magazino Hall on the Waterfront. Part of the building will be used to house the convention, but we used the more run down part of the building for the shoot. I wore the worst shoes for this type of building: very uncomfortable white heels that made walking difficult and even a bit painful. That's what you get for wearing badly fitting shoes.


 I changed quickly into my Fionna costume. Luckily I wore the same wig for both costumes, which saved time. 
Cosplayer: MalteseLizzieMcGee cosplay
Photographer: JD Media https://www.facebook.com/jdmediamalta/?fref=ts

I've had this rusty old sword in my wardrobe for a long time, and thought it would be perfect for Fionna.

My dress did get a couple of marks from dust and dirt. Hopefully those will wash out! You can see the uncomfortable shoes in this photo: I bought them for Madokami (that project isn't progressing any time soon :( ) but they are too big and mega uncomfortable: I stuffed the toes with tissue paper to try to make them fit, and now they are even more uncomfortable.


Tuesday, April 21, 2015

Medieval Mdina 2015: Juliet Photos

Medieval Mdina is over! It was quiet but good this year. I was only able to go up on Saturday afternoon (curse you ethers, aromatic compounds, and ionic equilibria). My Mum took some photos of the costume before I left. 

I met up with friends from college and we looked at the various sights, such as drummers, flag throwers, the slave market, falconry, and archery. I sadly didn't get photos because I was dumb and forgot my SD card. Luckily my friend agreed to take some photos. Her tumblr is: http://unenthusiasticorgasm.tumblr.com/ Go say hi :)

 She also managed to photograph me talking my way out of being executed. Step 1: have a dress with pockets, so you can keep coins in those pockets, so you can BRIBE the executioner.
Step 2: Show everyone that you're all right.
 Step 3: Laugh about it. Unless you're Ned Stark. Then you're screwed.

Summary of how this costume was made:
Part 1: White under-dress http://malteselizziemcgee.blogspot.com/2015/02/sakizos-juliette-part-1-mock-ups-and.html
Step 2: Mask http://malteselizziemcgee.blogspot.com/2015/02/sakizos-juliet-masquerade-mask-i.html
Step 3: Bodice & Beading http://malteselizziemcgee.blogspot.com/2015/02/sakizos-juliet-part-3-bodice-and-beading.html
Step 4: Skirt http://malteselizziemcgee.blogspot.com/2015/03/sakizos-juliet-part-4-skirt.html
Step 5: Jewels http://malteselizziemcgee.blogspot.com/2015/04/sakizos-juliet-part-5-jewels.html
Step 6: Sleeves http://malteselizziemcgee.blogspot.com/2015/04/sakizos-juliette-part-6-sleeves.html
Step 7: Head dress http://malteselizziemcgee.blogspot.com/2015/04/sakizos-juliet-part-7-head-dress.html
:

Friday, April 17, 2015

Sakizo's Juliet: Part 7: Head Dress

I stayed up late last night to make this head dress. Sadly it turns out that the Short Film Festival at Medieval Mdina has been cancelled. Oh well, I will still wear the costume at Medieval Mdina, so I'm glad I finished it.

The first step was to make a plastic frame. i forgot to take photos, but it is basically two longer pieces of plastic (similar to bones for corsets) glued together at the ends to make a hairband, with short pieces of plastic glued along the empty space in the middle to help support it. Then I glued foam to the head band on both sides to pad it. Next I stuck a piece of lining material to the underside.
 I then cut a piece of velvet big enough to cover the head band. Next I pinned it into place and hand sewed it to the lining to keep it in place.
 It looked like this when I was done:
 Next step: decoration. I sewed on gold flowers and lace ruffles, then glued on half pearl beads.
 More decoration! White puffy trim, more lace. gems, miniature masks, pearl beads. This is not entirely accurate to Sakizo's design, but I didn't really want a head dress that went under my chin. 

 The very last step was to sew on ribbons to tie it closed. Looks quite pretty, doesn't it?


Monday, April 13, 2015

Sakizo's Juliet: Part 6: Sleeves

So the sleeves are done. The only parts of the costume remaining are accessories, but i doubt I'll be able to finish anything else in time for Medieval Mdina, so that will have to wait.
The first strep was making these sleeve caps out of gold lace, white satin, and interfacing. I also basted on the velvet and satin tabs. This makes them easier to sew in.
The upper sleeve is a puff sleeve pattern (Burda's Danielle). I wish I'd made it a little wider, to be honest. I interfaced the stretch velvet, then drew and cut each sleeve. The next step was the tedious business of measuring the sleeve and dividing it into sections to decide where the sew all the embellishments. I had a limited amount of gold and white cord, so I only sewed on 5 lines of cord per sleeve.
The white puffy strips of material were made following the advice of DoxieQueen1's guide to sewing this costume. It involves cutting a strip of fabric, ironing the edges under, then gathering it at regular intervals.
To create double puffs, I sewed a thin piece of elastic to the middle of the sleeves, stretching as I sewed to gather it.
Here's what the unfinished upper sleeves looked like.


The next step was creating the lower sleeves. I measured my arm and made a simple pattern from the circumference of my elbow, the circumference of my hand (important so that your hand can fit through the sleeve) and the length I wanted the sleeve to be. Again I interfaced the velvet before cutting. Once the lower sleeve was cut, I ruffled strips of white stretch mesh (cut from an old apron I made a while ago) and sewed them on to the end of each sleeve. 

The gold decoration is actually a piece of lace that I cut up and used for applique. 

I sewed the lower sleeve to the upper sleeve, then sewed each sleeve into a tube. Finally I sewed them to the bodice. I want to take them off and reattach them in the future, as the gathering is too bulky under the arm and not puffy enough on top.
The lining of this costume is a disaster, but it looks pretty from the outside, so that's something.

Thursday, April 2, 2015

Sakizo's Juliet: Part 5: Jewels

I got a little bored of sewing, and decided to start making the jewellery. I didn't take photos for all the steps, but the first part is quite simple. The choker is a strip of interfaced velvet, sewn into a tube and turned inside out, then decorated with trim and lace. I stuck on some half pearls with E6000, and closed it with a hook and eye.

Next . . . the gems.
No, not those gems. These gems.
I don't know how to use resin, but I did find several tutorials for making hot glue gems, though I altered the method. Instead of melting the glue in the microwave, I melted sections of glue stick in a metal spoon over the gas hob (be careful when you do this), and used a bodkin to stir in eye-shadow for colour. Once the glue mix looked right, I poured the glue on to some foil in the shape that I wanted. A mold would have been more precise, but i didn't have time. I could have used to spoon as a mold, but I found that the glue was too sticky and wouldn't come out of the spoon bowl. Once I was finished, I had 10 glue gems.
 Once the gems had cooled, I trimmed off the extra foil, and started gluing pearl beads around the circumference of each gem.
Took a while. E6000 stinks and is not something you want to inhale, so work in a well ventilated area.
And here are the finished gems. I really like the result of this experiment. They lack the clarity of resin, but they do still have a mineral look to them.
 Next step was to stick the big gem on to the choker. I also sewed on some lengths of pearl strings for decoration. 
 The next steps were making the ruff and the pearl necklace. The ruff was made by folding a strip of satin into the right folds, tacking them into place, and sewing them on to a strip of material, attaching that in turn to the choker.
 My method for making the pearl necklace was not very professional. I looped pearl beads on to some nylon fishing wire (should have used thinner wire), and tied it to make a loop of pearls. I managed to fix some jump rings and lobster clasps on to the ends, and sewed jump rings to the dress. The blue gem is glued on to the necklace. The tear drop pearls are glued on to the blue gem - there's thin clear thread looped around each one, then knotted and attached with glue to the gem. 


Saturday, March 28, 2015

Sakizo's Juliet: Part 4: The Skirt

Making the skirt for this dress was not fun. I should have interfaced all the velvet, because it kept shifting when I tried to cut it. Even the lining material was difficult to cut properly. I intended to fully lining this dress, and cut out the bodice and skirt from lining material. 
I even added side pockets. 
 Lining the dress was a disaster. The lining and the velvet were not the same size, and it would not lie flat. I scrapped the lining on the skirt and only lined the bodice. Luckily I could salvage the velvet. The best option seemed to be ironing on interfacing to stop the fabric slipping about, then hem and decorate the skirt as I had originally planned. The hidden pockets would have to go on the white under-dress.