Showing posts with label top. Show all posts

Monday, June 4, 2018

Hipster Ariel

Just a short post about an outfit I made over the past two days. I needed a break from the Royal Suit, and decided to make a summer outfit. I had this beautiful green mermaid fabric, and I wanted to make an Ariel inspired look (my very first cosplay was Ariel, so this is also a nod to that).

I used an existing skirt to create a pattern for this one. I traced the pattern on to the mermaid cloth, cut it out, and sewed the pieces together. I added a waistband, then a zip for closure. Originally I wanted to have pockets, but they gaped open and looked so ugly that I got rid of them. One day I will learn how to make pockets that do not gape open. 

For the top, I was inspired by an Annika Victoria tutorial:

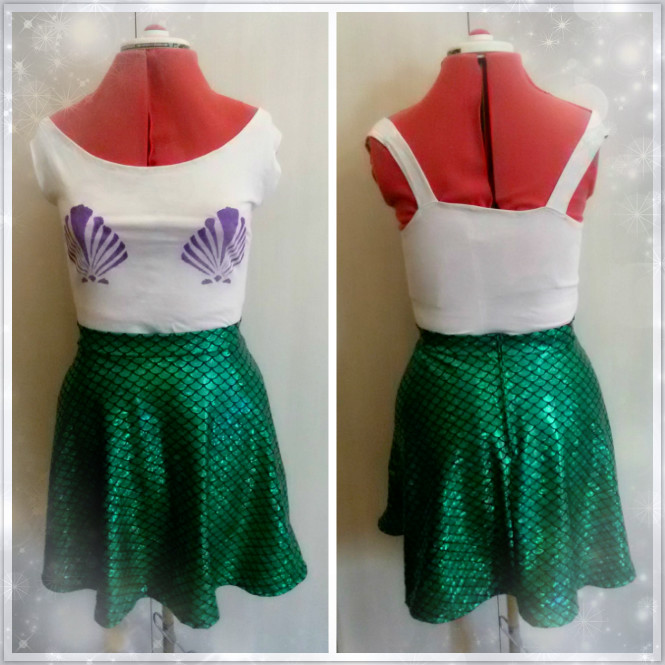
I made from crop top from an old, cut up t-shirt. The resulting top is a bit wonky, but at least it looks nice from the front. 

Tuesday, March 29, 2016

Harley Quinn Suicide Squad: T-Shirt


I've slowly been making progress on Harley Quinn's Suicide Squad outfit. If Suicide Squad is anything like Batman v Superman (allegedly) is, then  I'll be disappointed, but I still like this bizarre costume. 

The Shirt
I mixed fabric medium with acrylic paint and painted the areas that I wanted red. I used masking tape to mask out these areas. Once all the paint dried (with some help from a hair dryer), I painted the other side. I watered down some paint to create the ombre/blotchy effect. I made the sleeve blue by wetting part of the left sleeves, then mixing up watered down blue acrylic. I dipped the lower part of the sleeve into blue paint mix - the blue paint naturally is absorbed by the wet fabric, creating a natural ombre effect. Unfortunately, the red stripes were not perfectly dry, so I also have a few red streaks on that sleeve. 
Once all the paint was bone dry, I ironed the shirt to set the paint. I printed out the logo (I think I found it on the sorry girls tumblr), and drew on the back of the paper with pencil. By rubbing the front of the paper with a pen, I transferred the outlines of the letters to the shirt, then used fabric and permanent markers to colour it in. 
I cut off the collar and shape the neckline a little. I’d rather not distress the shirt as I’d like to wear it to university, so I left it as is. I had to alter the collar a little, because I made a mistake when I was painting the shirt. I stretched out the shirt too much during painting, so it dried stretched, and was gaped a bit at the neckline. I pinned and sewed a small dart - simple fix.  


Sunday, August 10, 2014

Retro Catwoman Part 2: Bustier and Accessories

The Catwoman costume is done, and in a very short amount of time; maybe a weekend tops?

I used a Burdastyle pattern for the bustier. I should have made a mockup, because it is a little large for me. Also, when the pattern instruction tell you to cut the boning shorter, you should do that, because the bones interfered with the top stitching. And maybe hot pink lining wasn't the best idea. Despite this, I'm very pleased with my first cupped bustier.
 It's not a Catwoman costume without some kind of cat ears. I used pleather scraps to make these ears, then glued them on to a head band. 
To complete the costume, I bought some goggles from ebay seller asvpshop. 
http://www.ebay.co.uk/itm/251052896650?var=550261164716&ssPageName=STRK:MEWNX:IT&_trksid=p3984.m1439.l2649
I order a pair with red lenses. I was actually surprised that they came with two pairs of lenses: one black, one red. The lenses were a bit dirty; I think I need to scrub them with glasses-cleaning spray or similar.
 They fit very well, and are great for this costume,though I think I will wear them up on my head because seeing everything through a red haze is quite strange.


Wednesday, August 22, 2012

Square studded top

 Here's a project I've just finished.
Front
The fabric was bought to make trousers for a cosplay. The material is some kind of synthetic material. It is very soft, and feels a little like velvet, though it is very smooth. I had a lot of it left over after making my trousers, and was wondering what to make with it. So I logged on to Youtube to get some ideas.

This is what I found
Oh how I love you, Secret Life of a Bionerd! She has some of the best tutorials. I decided to make a top similar to that she created in her video.


Back
 There are a few differences between Bionerd's method and mine. I had to make the back bigger and add elastic, because my material is non stretch. I wanted my square to be very flowing, so rather than sewing their sides into the blouse's side seams, I added the squares after I had sewn the side seams.

I was also inspired by one of my favourite science fiction films: Serenity. In the climatic fight between River Tam and the Reavers, River wears a gorgeous khaki dress decorated with little studs (possibly brads?). 

I loved the design of the dress and wanted to pay tribute to it. I had a torn studded belt, so I removed the studs from that, and added them to the top.
Side
This top is very comfortable. This was also my first time draping a pattern from my body form, and overall I am pleased with the result, though I had trouble placing the darts (you can't see them, but they're there, hidden under the squares of material). The material is synthetic, so it would probably be more suitable for evening wear (gotta beat the heat!).

I am considering selling this top, and offering similar tops on a made to order basis. Contact me if you are interested: leave a comment below.