Showing posts with label t-shirt. Show all posts

Sunday, April 21, 2019

Easter Sewing Projects

Long time no see, eh?
Vet school means very little time for sewing and cosplay, but I did manage a few projects during the Easter holidays.

T-shirt reconstruction:

I altered my Deadpool shirt fron Qwertee, following an old Threadbanger tutorial that Corinne did years ago. 


I followed another one of Corinne's t-shirt reconstruction tutorials and altered this goat t-shirt: it was an XL before.
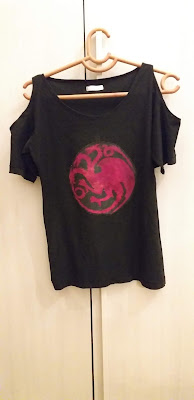
 I also altered these black t-shirts to give them a cold-shoulder design. I made patches based on the sigils from Game of Thrones, and sewed those on for decoration. 

I made a little waist pouch for days when I want to wear leggings or skirts without pockets. The pouch is made from fake suede (originally part of a curtain) and closes with a zip. There's a plastic buckle at the back, and I used webbing for the belt. 


 Finally, I altered a tartan shirt dress that I had. It was a bit tight and I didn't wear it that often. I cut it apart and made a new bodice, using a bit of black spandex to make extra bodice panels to improve the fit. 

 The original dress had a nicely flared skirt, which I kept, but I added pockets, and some black lace to the hem. The lace originally came from an old shrug: I had picked all the lace trim off to use for another project. I used up all of the lace, and had just enough for the hem.

 I used grommet tape for the straps (this is the last of the grommet tape that I used to make my Violet Baudelaire costume!) and an old curtain ring for the back of the dress.


Tuesday, March 29, 2016

Harley Quinn Suicide Squad: T-Shirt


I've slowly been making progress on Harley Quinn's Suicide Squad outfit. If Suicide Squad is anything like Batman v Superman (allegedly) is, then  I'll be disappointed, but I still like this bizarre costume. 

The Shirt
I mixed fabric medium with acrylic paint and painted the areas that I wanted red. I used masking tape to mask out these areas. Once all the paint dried (with some help from a hair dryer), I painted the other side. I watered down some paint to create the ombre/blotchy effect. I made the sleeve blue by wetting part of the left sleeves, then mixing up watered down blue acrylic. I dipped the lower part of the sleeve into blue paint mix - the blue paint naturally is absorbed by the wet fabric, creating a natural ombre effect. Unfortunately, the red stripes were not perfectly dry, so I also have a few red streaks on that sleeve. 
Once all the paint was bone dry, I ironed the shirt to set the paint. I printed out the logo (I think I found it on the sorry girls tumblr), and drew on the back of the paper with pencil. By rubbing the front of the paper with a pen, I transferred the outlines of the letters to the shirt, then used fabric and permanent markers to colour it in. 
I cut off the collar and shape the neckline a little. I’d rather not distress the shirt as I’d like to wear it to university, so I left it as is. I had to alter the collar a little, because I made a mistake when I was painting the shirt. I stretched out the shirt too much during painting, so it dried stretched, and was gaped a bit at the neckline. I pinned and sewed a small dart - simple fix.  


Sunday, December 22, 2013

Pop Art Cats

 Pop art cats! I've always wanted to try this. Black and white cats have the high contrast appearance of a pop art print, so they are the perfect subject for this mini-project. I used photos of some of my cats (all past, since they are either now deceased or moved out): Boris, Olga, and Indi(go). 
 I followed a tutorial, which recommended using the threshold tool in Photoshop. It's more effective than the level adjustment. I also had a duplicate layer that was pixellated to get a screentone texture, but it doesn't show much (probably need to play around more with the layers and pixel size)
One weird thing I noticed was the colour difference when I switched from the main computer to a laptop. The colours on the main computer were very bright, but on the laptop, they looked washed out. I altered the pictures on the laptop to make them look bright again, but I'm still really surprised at just how different they looked. I'm beginning to see the importance of test prints. 

I'm thinking that these might look nice on a t-shirt. Maybe screen printing should be my next project.

Monday, January 30, 2012

Sweet Pea's leotard

Okay, I know she isn't actually wearing a leotard, but more about that later.

Fasten with hook and eye tape at crotch
 In all the stills, footage, and statuettes, Sweet Pea appears to be wearing a bikini under her coat. I'm not comfortable wearing that little, so I decided to make a leotard to replace my stretch velvet t-shirt and shorts.

This was quite simple. The top part is a tank top; the bottom was made by tracing some underwear and adding a trapezoidal shape to the top, to make high waisted hot pants. Then I sewed up the pants, and sewed them to the top. The leotard has hook and eye tape at the crotch for convenience's sake. The silver writing is there because the pants used to be a t-shirt (so this project is technically a t-shirt recon).
I also found time to make a bullet bandoleer for my boot. This used to be a choker: I sewed a strip of black pleather on top, making sure to leave loops for the bullets. The bullets are made from card, thin black tape, and red paper, stuffed with crepe paper to make them tougher.

Thursday, July 14, 2011

Alterations

One reason that I love sewing is because it allows you to take something from your wardrobe that no longer fits and to MAKE IT FIT. Let's take this dress as an example.

The dress in question

I bought this two or so years ago from Peacocks. Not what I'd usually buy, but  for some reason the bright green really appealed to me. The dress was also very comfortable in the hot sun, and easy to get on and off, since the back was shirred. Unfortunatley, the shirring was also the dress's downfall. Eventually, probably due to a few too many trips through the washing machine, the elastic thread stretched, making the dress impractical to wear, even with the thin removable straps that came with the dress. So the dress sat in my wardrobe for a while.


Today, I felt like fixing it. So I did. I had a pattern traced for another dress, so I decided to use that-I probably could hav e pinched and pinned the dress into shape, but I was worried that, without a properly drafted back, the zip would balloon outwards, as it did for my Giselle costume. So I removed all the elastic from the back, cut out the back panel, and used that material to trace my pattern pieces on to. Once the two pieces were traced, I "overlocked" (zig zagged around hte edged-the poor tailor's alternative to an overlock machine) the edges of the pieces and sewed everything on, adding a zip that I'd cannibalised from a broken bum bag.


Note the exposed zipper: it actually looks pretty good
Voila! Fits much better, especially since i added two tiny darts in the sides, and there's no chance of it slipping down. I'm especially pleased that it turned out so well because it means that i can use this method on another dress in the same style which has the same problem.


Alterations aren't the only project I've finished. Ever since i saw threadbanger's t-skirt video I've been itching to make one. I finally broke out my t-shirt supply and made one yesterday-with a differnece.


The frayed strips were inspired by Subcunha's skirt flap destroyer. To make them I used the remains of some velour trousers and part of a t-shirt. I think the waistband was part of a strap on another t-shirt.


More Cut Out+Keep inspiration in the form of bottle cap lockets. The bat one's my favourite. I wish i knew what it came from. The other two are beer caps. 

Sunday, April 3, 2011

St Patrick's Day Hoodie and hanging pookets

The St Patrick's day hoodie was actually finished on the eve of the 16th-just in the nick of time. It's made fom an old black sweat shirt . . .

. . . and a shiny green hoodie (sorry for the terrible quality)
Here are some WIPS. This one was after I'd finished the body but was constructing the hood
The hood and the liningThe finished hoodie
And no St Patrick's day clothing would be complete without a shamrock. I appliqued mine on: I wish I'd used intrfacing because it kept sliding around.
Another project I'm working on is what I'm calling hanging pockets, though there's probably a proper word. There just pockets sewn to backing fabric, and you hang it from the wall and store whatever you want in them. I saw one in the background of Secret Life of a Bionerd's video's and thought I would try and make one. Unfortunatley my sewing machine got jammed, so the pockets will have to be sewn on by hand. Does nayone lese have this much trouble with the Silvercrest machine from LIDL?

Sunday, July 11, 2010

T-shirt recon and skirt to handbag

Since my efforts at creating a dress did not go well (the dye went navy rather than black, the dress itself didn't change colour at all etc.) I needed a simpler project, so I remade a t-shirt. The original t-shirt was an ordinary boxy t-shirt that my parents bought in the Camargue, which I remade into a more fitted t-shirt with better looking sleeves. I'm particularly happy with this because I didn't use any tutorials, just the pinch and pin technique.

T-shirts are fun to reconstruct: they are very versatile and can be remade into a myriad of new clothes or accessories. I plan to do more t-shirt makeovers. One thing I want to try in particular is to make a blotchy looking t-shirt, such as this I'm not sure how to achieve this affect: is it


a) tie dye on a plain white shirt using red dye and black dye


b) tie dye using bleach on a black shirt


c) tie dye on a red shirt using black dye


d) tie dye using bleach followed by dying the shirt red


e) something else?

I've been experimenting with t-shirt designs, such as this:
but sometimes a printed design is a little boring on its own, so dying techniques and how to add embellishments are all going to be useful in making unique t-shirts


My other weekend project was making a skirt handbag. It isn't the first one I made, but it is the first one with a proper strap that won't fall apart. I hand-sewed this bag because I couldn't be bothered to change the needle on the machine. I used an enormous denim skirt that ended up in my fabric pile: in fact, I have enough material left over to make another skirt-or handbag.

I'm going to continue to think of way of creating my star-dress. I'm considering creating a corset-like dress, without boning, something like the t-shirt in this video http://www.youtube.com/watch?v=hdmsPTLnhRA&feature=related . I don't think I'll put in any lacing; a zipper up the back is just fine. I just need to find the right fabric.

EDIT: I have to start thinking about what to cosplay for Comic Con. the Convention is mid-October, so it will still be warm. So far, Neytiri (Avatar), Masane (Witchblade: firast Witchblade transformation), San (Princess Mononoke) and Violet (A Series of Unfortunate Events) seem the best options.